Add Row
Add Element
UPDATE
Add Element
  • Home
  • Categories
    • Cleaning & Moving
    • Maintenance / Repairs
    • Remodeling & Construction
    • Landscaping / Outdoor
    • Security & Technology
    • Sustainability, Health & Safety
    • Interiors / Décor
    • Expert Interviews
    • DIY Home Projects
Home Wise News!
Wise Insights, Reliable Contractor Advice & Hands on DIY Know How for Savvy Homeowners
September 06.2025
3 Minutes Read

Banish Hard Water Stains From Glass: Your Ultimate Cleaning Guide

Close-up of glass door with hard water stains in a shower stall.

Understanding Hard Water Stains: The Unwanted Guests on Your Glass

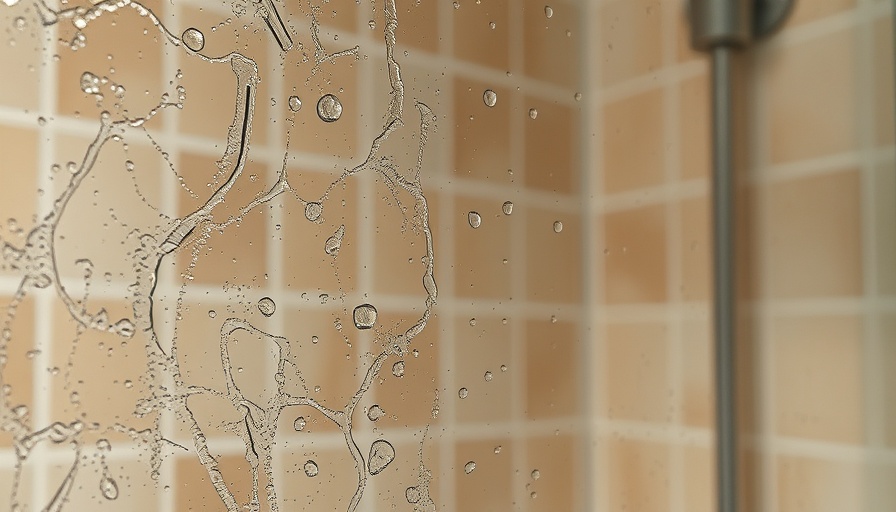
Hard water stains can seem like an unavoidable nuisance when it comes to maintaining the pristine look of your glass surfaces. These unsightly marks are primarily caused by minerals such as calcium and magnesium left behind after water has evaporated. Not only do they mar the beauty of your windows, shower doors, or glassware, but they can also be tough to remove if left untreated for too long. In this guide, we’ll explore various effective methods to banish those stubborn hard water stains for good, ensuring your glass stays sparkling clear.

Why Hard Water Stains Matter: The Hidden Impact on Your Home

While you may think of hard water stains as merely unsightly blemishes, they can have more than just an aesthetic impact on your home. Over time, these mineral deposits can etch and scratch glass surfaces, leading to costly repairs or replacements. This is particularly true for shower doors which, if left untreated, may require more than just traditional cleaning methods. Therefore, acting quickly and efficiently is key to preserving both the look and longevity of your glass.

Choose Your Weapon: Different Techniques for Removing Hard Water Stains

Addressing hard water stains can be tackled with several household items and methods. Here are a few that stand out:

  • Vinegar and Baking Soda: An age-old remedy, a mixture of vinegar and baking soda can effectively dissolve mineral deposits. Simply mix them into a paste and apply to the affected area, then wipe clean with a damp cloth.
  • Lemon Juice: The citric acid in lemon juice acts similarly to vinegar. Apply fresh lemon juice to the stains, let it sit, and then scrub gently with a soft cloth for sparkling results.
  • Commercial Products: For those who prefer a quick-fix, various commercial hard water stain removers are available. Just be sure to choose one that is safe for glass and follow the manufacturer's instructions.

Prevention: Simple Tips to Keep Hard Water Stains at Bay

Prevention is always better than cure! Here are some practical tips to minimize hard water stains from appearing in the first place:

  • Wipe Down Surfaces Regularly: After using your shower or washing dishes, quickly wipe down the glass surfaces to remove excess moisture.
  • Invest in a Water Softener: If hard water is a continuous problem in your area, consider installing a water softener for your home to reduce mineral deposits from the get-go.
  • Use Squeegees: For glass shower doors, keep a squeegee handy to swipe away water after each use, helping to cut down on stains from the start.

Alternative Methods: Exploring Eco-Friendly Solutions

If you're inclined towards eco-friendly solutions, there are natural alternatives you can try:

  • Baking Soda Paste: Mix baking soda with a little water to create a paste that can be scrubbed onto stains without harsh chemicals.
  • Essential Oils: Some essential oils, like tea tree or eucalyptus, possess properties that can help dissolve mineral deposits while leaving a pleasant scent.

When DIY Is Not Enough: Knowing When to Call in the Professionals

While numerous DIY methods exist to tackle hard water stains, there may be instances where it’s best to call in professionals. If hard water stains are exceptionally stubborn, or if they have etched into the glass, professional cleaning services can provide deeper cleaning without risking damage to your surfaces.

The Takeaway: Enjoying Cleaner Glass Surfaces in No Time

Removing hard water stains can seem daunting, but with the right approach and tools at your disposal, it becomes a manageable task. Incorporate some of the prevention tips into your routine, and you’ll enjoy clearer glass surfaces in no time. Remember, consistency is key; a little effort each day can save you from dealing with stubborn stains in the future!

Cleaning & Moving

0 Comments

Write A Comment

*
*
Please complete the captcha to submit your comment.
Related Posts All Posts
04.08.2026

Discover How to Clean Under Your Stove Without Moving It An Inch

Update The Hidden Mess Under Your Stove Wondering what could be lurking beneath your stove? If you haven’t taken a peek in a while, you might be in for a surprise. From forgotten food and dust bunnies to crumbs that could attract unwelcome guests, the area under and behind the stove is often the Chernobyl of kitchen cleaning. Thankfully, with some simple tricks, you won’t need to move your heavy appliance to tackle this cleaning dilemma. Why Cleaning Under Your Stove Matters Keeping your kitchen tidy goes beyond just making it look nice. Regularly cleaning underneath your stove can reduce allergens, banish pests, and enhance your overall kitchen hygiene. The Centers for Disease Control and Prevention warns that vermin and molds thriving in hidden corners can lead to health issues, including allergies and, in extreme cases, infections. Therefore, cleaning this area isn't merely a cosmetic task; it's a crucial step in safeguarding your health. Easy Steps to Clean Without Moving Your Stove First, if you have a warming drawer, this may be a secret weapon. Pull out that drawer entirely, as it gives you immediate access to the floor beneath your stove without needing to wrestle the whole appliance away from the wall. Vacuum the visible dirt and crumbs, and for any stubborn debris, apply an all-purpose cleaner. If necessary, use a plastic scraper to help lift it. Once clean, let the area dry before replacing the drawer. Using the Right Tools for the Job As you engage in this task, it can be helpful to have a few handy tools by your side. A vacuum with a hose attachment is ideal for tight corners, while a microfiber cloth can effectively pick up dust. To tackle greasy residues, a degreaser will be your best friend. A soft-bristled brush can also help dislodge any stuck-on grime. Just as important, remember to follow with a clean, damp cloth to remove any cleaning solution residue. How Often Should This Be Done? Most experts recommend cleaning behind and underneath your stove at least twice a year. However, if you're an avid home cook, consider a more frequent cleaning schedule. This habit prevents the buildup of grease and allergens that can create an unhealthy cooking environment. Preventing Future Messes: A Proactive Approach The best defense against future messes is a good offense. Using liners and splatter guards can catch potential spills before they reach the floor. Additionally, implementing a regular cleaning checklist helps maintain cleanliness across all major kitchen appliances. Set a specific day of the week for different appliance cleanings to distribute the workload and keep your kitchen in check. Feeling Overwhelmed? Simplifying Kitchen Cleaning If the thought of cleaning your stove's underbelly sounds daunting, remember to take it a step at a time. Breaking tasks into manageable parts makes it less intimidating. Start with a quick vacuum session, and when you find a spare few minutes, tackle deeper cleaning tasks. You’ll find that with a little effort, your kitchen can stay clean and sparkling. Celebrating the Little Victories Cleaning your stove’s nooks and crannies may seem like a mundane chore, but it’s one final achievement that brings peace of mind. The simple act of knowing you're taking control of your cooking environment can be surprisingly empowering. So next time you reach for that warming drawer, remember: it’s not just about comfort food; it’s about comfort in your health and home! And if you're seeking further insights on how to maintain a smart and clean kitchen, consider strategizing your cleaning schedule!

04.07.2026

Avoid These Surfaces: 10 Things You Should Never Clean With Disinfecting Wipes

Update Cleaning Strategy: Choosing Wisely for a Spotless Home It’s a common scene in homes across the country: after a busy day, the kitchen is cleared, the dishes packed away, and it’s time to reach for the trusty disinfecting wipes. While the convenience of such products cannot be denied, they are not the universal cleaning tool many assume them to be. In fact, experts warn that using disinfecting wipes irresponsibly can result in damaging various surfaces throughout your home. Let’s break down some key areas where you might want to resist the urge to wipe away! Surfaces to Avoid: What Not to Wipe Based on insights from cleaning experts and industry insiders, here’s a handy list of items you should steer clear of when it comes to disinfecting wipes. Leather: This includes your favorite leather sofa and cherished bags. Disinfecting wipes can lead to discoloration and deterioration, making a small stain into a big repair job. Vinyl: From car seats to vinyl flooring, wipes containing harsh chemicals can cause fading or brittleness. Stick to cleaners specifically designed for vinyl surfaces. Wood and Unsealed Surfaces: Woods like oak or fine finishes are susceptible to moisture damage. Disinfecting wipes can strip protective coatings and lead to long-term harm. High-Touch Food Areas: Cutouts in safe practices suggest avoiding these wipes on surfaces where food is prepared or served. Rinsing afterward does not guarantee safety! Electronics: Screens on devices may harbor germs, but using disinfecting wipes might damage the protective coatings on your devices. Instead, reach for microfiber cloths or dedicated screen cleaners. Children’s Toys: While it might seem like a quick fix after playtime, the chemicals can leach into toys that are commonly mouthed by little ones. The Importance of Proper Disinfection Dean F. Tansman, a veteran in the cleaning industry, highlights that true disinfection requires the surface to remain wet for the necessary 15-30 seconds specified on product labels. This means even if you wipe a surface clean, you may not achieve true disinfection without following this crucial step. Tansman warns: “Using wipes haphazardly might create more problems than they solve. Choose the right tool for the job.” Rethinking Cleaning: When to Use Wipes Disinfecting wipes have their place, particularly in high-risk areas where sanitization is paramount, such as bathrooms or kitchen counters after meal prep. However, they should not replace traditional cleaning methods. Sometimes, soap and water do the job just as effectively without the risk of damaging delicate surfaces. And while it's tempting to use a wipe for every surface, taking the time to think about the product you're reaching for can save you from future headaches. Alternatives to Disinfecting Wipes If you’re wondering what to use in place of these ubiquitous wipes, consider reintroducing some classic cleaning solutions: basic soap and water is a fantastic alternative, specially formulated surface cleaners exist for various materials, and natural products like vinegar or baking soda can do wonders without harsh chemicals. Depending on the job, keep handy things like: Microfiber cloths for dusting and cleaning surfaces safely Soapy water for general cleaning tasks Natural disinfectants for high-touch areas that are child-safe Conclusion: Mind Your Surfaces In conclusion, while the convenience of disinfecting wipes is undeniable, understanding their limitations is essential for proper cleaning and maintenance in your home. Reach for the wipes when necessary, but keep a deeper awareness of the surfaces they aren't suited for. Ensuring you have a variety of cleaning methods at your disposal protects both your home and your health. So next time you grab those wipes, pause for a moment and ask yourself: “Is this the right tool for my task?” Making informed choices can lead to a safer and cleaner environment! With this knowledge at your fingertips, take the charge in maintaining your home. Avoid using wipes on the no-go items detailed above, and you'll be on your way to achieving a truly spotless living space without harmful effects.

04.06.2026

Refresh Your Kitchen: 8 Essential Items Chefs Recommend Replacing Each Year

Update Why You Should Commit to a Kitchen Refresh Every Year Kitchen organization can often feel like an overwhelming task, especially when you realize how quickly your valuable tools and utensils can become unreliable. Chefs around the globe often emphasize the importance of refreshing kitchen essentials every year—not only to maintain safety but also to enhance your cooking experience. By thoughtfully replacing key kitchen items annually, you can ensure a cleaner and more effective cooking environment. The Unsung Heroes: What to Replace Annually According to various culinary experts, several common kitchen tools and ingredients benefit from regular replacement. Here’s a comprehensive list to help keep your kitchen safe and functional: 1. Kitchen Towels: The Workhorses of Your Kitchen Kitchen towels often go through the wringer—not only drying hands but also cleaning spills and handling hot dishes. Despite frequent washing, they can collect bacteria and odors over time. If your towels are starting to feel rough or smell unusual, it’s definitely time for a new set. 2. Plastic Cutting Boards: Safety First! While plastic cutting boards are a staple, they can develop deep grooves that harbor bacteria, particularly if used for raw meat. Replace them annually to minimize health risks. For those interested in sustainability, consider switching to a wooden cutting board, which can be maintained for years if properly cared for. 3. Everyday Cooking Utensils: The Backbone of Your Cookware We often underestimate utensils like spatulas and ladles until they start showing signs of wear, such as chipped edges or loose handles. Regularly replacing these ensures that your cooking remains not only enjoyable but also safe. 4. Leavening Agents: Keep Your Baking at Its Peak Subpar leavening agents like baking powder and baking soda can sabotage your baking projects if they aren’t replaced yearly. Over time, they lose effectiveness, leading to flat cakes and inconsistent baking results. 5. Spice Rack Staples: Freshen Up Your Flavors Ground spices and dried herbs lose their potency within six months to a year due to exposure to air and heat. If your dishes lack that vibrant flavor you’re used to, refresh your spice collection annually for the best tasting meals. The Importance of Specialty Cleaning Tools Often overlooked, tools like bottle brushes and sink scrubbers can harbor bacteria if kept longer than a year. Discoloration or unpleasant odors are clear signs they need replacing. Making this simple shift helps maintain not just hygiene, but also the integrity of your kitchen. Counterarguments and Alternative Perspectives While some believe in maximizing the lifespan of kitchen items, it’s crucial to weigh the potential risks involved with compromised tools. Although traditional wisdom suggests holding onto durable items, cooking experts advocate for annual replacements to improve safety and efficiency. Embracing a Healthy Kitchen Environment A well-stocked kitchen contributes not only to good cooking but also to healthier meals. By replacing worn-out items regularly, you promote a safer cooking environment that encourages creativity in the kitchen. Conclusion: Elevate Your Culinary Experience Take the challenge to heart: develop a habit of refreshing essential kitchen items each year. By committing to this practice, you can keep your cooking fresh, efficient, and far more enjoyable. Start evaluating your kitchen supplies today and make a plan for those key items that need replacing for a more vibrant culinary space.

Terms of Service

Privacy Policy

Core Modal Title

Sorry, no results found

You Might Find These Articles Interesting

T
Please Check Your Email
We Will Be Following Up Shortly
*
*
*