Add Row
Add Element
UPDATE
Add Element
  • Home
  • Categories
    • Cleaning & Moving
    • Maintenance / Repairs
    • Remodeling & Construction
    • Landscaping / Outdoor
    • Security & Technology
    • Sustainability, Health & Safety
    • Interiors / Décor
    • Expert Interviews
    • DIY Home Projects
Home Wise News!
Wise Insights, Reliable Contractor Advice & Hands on DIY Know How for Savvy Homeowners
July 10.2025
3 Minutes Read

Craft the Cutest DIY Bookmarks: Enhance Your Reading Experience

Colorful marbled DIY bookmarks with tassels on wood.

Transform Your Reading Experience with DIY Bookmarks

As book lovers and homeowners alike understand, keeping track of a good story can be a challenging adventure, especially when you habitually misplace your bookmarks. Instead of resigning yourself to dog-eared pages, why not create your own decorative bookmarks? These DIY bookmarks not only save your page but also add a personal touch to your reading experience.

Why DIY Bookmarks?

In a world dominated by digital devices, there's something comforting about physical books. Many homeowners relish the tactile experience of flipping through pages and the satisfaction of setting aside their current read. Elegant bookmarks can enhance that experience, allowing you to personalize your library. Creating your bookmarks can even serve as a family bonding activity, making it a fun project for all ages.

Quick and Easy Steps to Craft Your Own Bookmarks

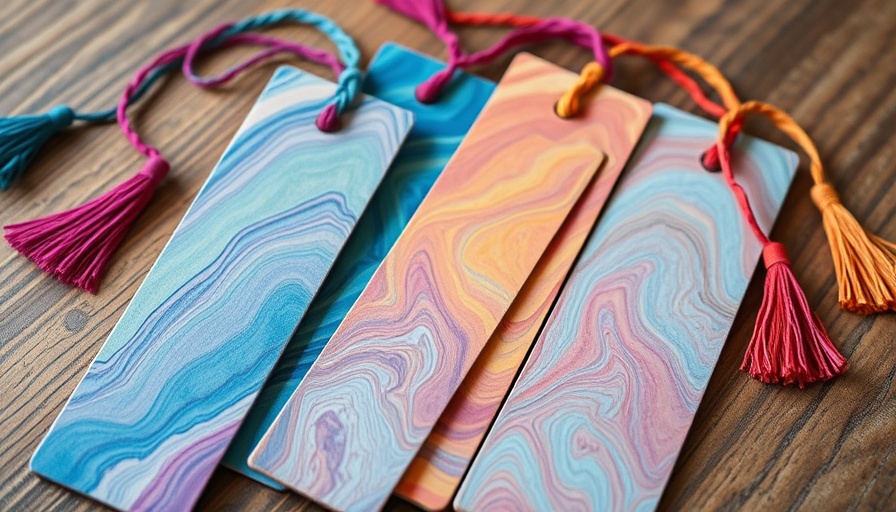
Creating your own DIY bookmarks is straightforward and can be done in just a few minutes. Below is a step-by-step guide to aid you in crafting personalized bookmarks that reflect your style.

Materials Needed:

  • Blank acrylic bookmarks
  • Acrylic paint in your favorite colors
  • Parchment paper
  • Mod Podge
  • Small craft paintbrush or foam brush

Step-by-Step Process for Crafting DIY Bookmarks

Step One: Prepare Your Bookmark
Start by peeling off the protective film on your acrylic bookmarks. This will allow the paint to adhere properly. As you embark on this creative endeavor, gather your chosen paint colors.

Step Two: Drizzle and Play with Paint
On a sheet of parchment paper, drizzle your chosen acrylic paints. The magic of this project lies in experimenting with different surface designs, whether drops, swirls, or lines.

Step Three: Apply and Create Patterns
Lightly press the bookmark into the paint-covered parchment, turning it to ensure the entire surface is coated. This creates unique patterns that reflect your artistic expression.

Step Four: Seal for Durability
Once the paint is dry, seal your design with Mod Podge to ensure longevity. After painting a couple of thin coats, remove the plastic cover from the back of your bookmark.

Additional DIY Craft Ideas to Explore

If you enjoyed making your bookmarks, consider branching out into other DIY projects. Crafts such as pinch pots or decorative coasters can further enhance your home’s decor and provide more fun activities to do together with family and friends.

Fostering Creativity and Connection

In today's fast-paced world, the simple act of crafting can foster not only creativity but also connection. Gather your children or significant other and make it a delightful evening of crafting. This opportunity not only yields beautiful bookmarks but also creates shared memories—a great heartwarming aspect of DIY home projects. With every page you turn, you’ll be reminded of the time spent together creating them.

Let’s Get Crafting!

Now that you have everything you need to start crafting, get those acrylic paints out and make DIY bookmarks that showcase your unique personality. Whether you keep them for yourself or gift them to fellow book lovers, these bookmarks are sure to be cherished.

Begin your creative journey today and transform your reading experience into something special with these easy-to-make DIY bookmarks!

DIY Home Projects

0 Comments

Write A Comment

*
*
Related Posts All Posts
02.21.2026

Transform Your Kitchen: Stylish Ways to Hide Clutter This Spring

Update Prepare Your Kitchen for Spring Cleaning with StyleThe vernal equinox is fast approaching, and it’s time to transition from winter comfort foods to fresh, seasonal recipes. This means it's also time to tackle spring cleaning, starting with one of the most-used rooms in our homes—the kitchen. If your cooking space has become cluttered over the winter, fear not! With strategic organization and stylish storage solutions, you can reclaim your kitchen counters and cabinets.First Things First: Declutter Before You CleanBefore you start scrubbing and polishing, it's crucial to declutter. Many kitchens serve multiple purposes: cooking, entertaining, and even working from home. This multi-functional nature can lead to clutter. Take an inventory of the items in your kitchen. Ask yourself: What do I use daily? What can be stored away? And what deserves a one-way ticket to the donation box?12 Stylish Ways to Hide Kitchen ClutterBased on recent trends and reader favorites from Southern Living's handy guide, we’ve compiled twelve must-have kitchen organizers that are as functional as they are chic. These clever storage solutions not only optimize space but also add elements of decor:Oropy Wooden Pot and Pan Hanging Rack Set: Perfect for displaying cookware while saving cabinet space.Vevor Kitchen Island Cart: A portable cart that can serve various purposes, from hosting a coffee station to providing extra storage.Nurture Knots Ceramic Utensil Crock Set: A two-piece crock for utensils that enhances countertop aesthetics and organization.Jutapiny Countertop Bread Box: More than just a bread holder; it can conceal snacks, vitamins, and other essentials.10 Strawberry Street Kitchen Canister Set: Ideal for storing dry goods, available in stylish colors.SpaceAid Bamboo Bag Organizer: Keeps kitchen drawers tidy and space-efficient.Luckinow Under-Cabinet Mug Hooks: Declutter your mug collection while displaying them beautifuly.Linda’s Essentials Over-the-Stove Shelf: Extends storage options overhead without taking up counter space.Nonam Storage Basket Set: Perfect for corraling miscellaneous items quietly.Mirtan Kitchen Sink Caddy: Keeps sponges and dish soaps organized and easily accessible.These items are not only functionally smart—they also enrich your kitchen's look. Utilizing these stylish storage solutions can breathe new life into your space, creating a fresh environment in readiness for spring.Maximize Space and Minimize StressBalance aesthetics and utility with crème-de-la-crème storage items while keeping your stress levels at bay. An organized kitchen helps not only in meal preparations but also becomes a more inviting space for friends and family. Happy cooking starts with a clear, clutter-free workspace.Get Excited for SpringAs you prepare to dive headfirst into spring cleaning, remember the mantra: Organize first, clean later! Embrace the opportunity to refresh your kitchen, setting you up for joyful cooking experiences ahead. With longer days and warmer weather on the horizon, it’s time to shine in the kitchen as you venture back into entertaining and baking after winter. Embrace the Spring TransitionInstead of delaying until the day spring officially arrives, why not get a head start on refreshing your home? After all, it’s about cultivating a welcoming space where you enjoy your time spent. So gather those organizers, roll up your sleeves, and transform your kitchen into a clutter-free realm. Tips from this article are proven methods to simplify your spring routine.

02.21.2026

Unlock Massive Savings During The Home Depot Tool Savings Event!

Update Save Big: The Home Depot Tool Savings Event Is Here As the winter months fade away, we shift our focus to springtime projects that get our homes and yards ready for the warmer days ahead. The Home Depot's Tool Savings Event is the perfect opportunity to upgrade your tool collection without breaking the bank. This annual event not only brings significant discounts on top brands like Milwaukee, DeWalt, and Ryobi but also includes enticing offers such as free tools and batteries. So grab your toolbox—it's time to dive into some DIY! Why This Sale is a Game-Changer for DIY Enthusiasts The Home Depot’s Tool Savings Event is renowned for its impressive savings on essential tools, making it the ideal time for homeowners and DIY aficionados to stock up. Whether you're looking to tackle a small home repair or engage in a grand remodeling project, now is a crucial moment to make your purchases. The savings include deep discounts, buy-one-get-one offers, and free tools with qualifying purchases, all aimed at providing essential resources for those eager to enhance their homes. Top Picks: Tools You Shouldn't Miss With so many options available, it can be overwhelming to know where to start. Here are some standout tools from the event that come highly recommended for their performance and versatility: Milwaukee M12 Brushless Cordless Extended Reach Box Ratchet: Perfect for tight spaces, this tool comes with a free battery pack, ensuring you have everything you need for those intricate jobs. Milwaukee M12 12V Cordless Compact Band Saw: Lightweight and easy to handle, this saw is a game changer for woodworkers looking for cleaner cuts. Milwaukee M18 18V High Torque Impact Wrench: Ideal for heavy-duty tasks, this tool offers powerful performance, with a complimentary tool available on qualifying purchases. Milwaukee M18 18V Cordless Grinder: A must-have for restoring garden furniture, this grinder can handle various materials while also being compact and easy to use. Get Ready for Your Spring Projects The arrival of spring is the perfect time for investments in home improvement. The Home Depot Tool Savings Event allows you to tackle DIY home projects while saving significant money. To be successful and safe, however, it's vital to have the right tools and knowledge. With robust gear in your arsenal, you'll be prepared to address repairs and upgrades, making your living space more functional and pleasant. Embrace DIY Projects with Confidence The satisfaction of completing a DIY project can be both thrilling and fulfilling. Understanding that you are capable of handling home repairs empowers you to take on larger tasks. Whether it's repairing a leaky sink or redoing your garden layout, your willingness to embrace DIY can significantly cut costs and improve your home. Common Misconceptions About DIY Projects Many people mistakenly believe that DIY projects require advanced skills or extensive knowledge. In reality, with the right tools and step-by-step guidance, most home repairs and improvements can be tackled successfully by beginners. Feeling intimidated is natural, but the more you practice your skills and extend your knowledge, the more comfortable you'll become. Remember, even skilled professionals started as novices! Leverage local workshops or online resources to enhance your DIY skills and boost your confidence. Actionable Tips for Successful DIY Projects 1. **Plan Your Projects**: Make a list of necessary tasks before embarking on any home improvement project. Prioritize them based on urgency and budget. 2. **Invest in Quality Tools**: It pays to buy tools that will last and perform well. Take advantage of sales like the Tool Savings Event to save on high-quality products. 3. **Get Familiar with Your Tools**: Spend some time getting to know how your tools operate before using them on a project. This reduces the risk of mistakes that may result in injury or damage. 4. **Follow Tutorials**: There are countless video tutorials available online that break down tasks into manageable steps. Take advantage of these resources—it's a great way to learn new skills. 5. **Ask for Help if Needed**: Don’t hesitate to ask for assistance from friends or family. Collaborative efforts not only make projects more fun but can also enhance the quality of your work. As we gear up for a vibrant spring, take advantage of The Home Depot Tool Savings Event to enhance your DIY project potential. Not only will you save on necessary tools, but you'll also equip yourself to tackle those home and yard projects with newfound confidence.

02.20.2026

Transform Your Space: Genius Ways to Use Plywood in DIY Projects

Update Discover the Unexpected Uses of Plywood in Your HomePlywood is often viewed merely as a building material, but its versatility allows for an array of creative applications that can enhance your home and lifestyle. As a material that boasts strength and durability, plywood opens doors for DIY enthusiasts and homeowners alike. From practical construction to artistic endeavors, here are some genius ways to use plywood that might have never crossed your mind.Revolutionize Your Outdoor EntertainingWhen hosting gatherings, protecting your lawn is crucial. Placing 3/4” plywood sheets under heavy equipment such as tents or food stations can prevent unsightly damage to your grass. Lawn expert Steve Corcoran explains that this practice distributes weight evenly. Additionally, plywood can create temporary pathways through muddy patches, avoiding the sinking that occurs with smaller supports. To improve traction, consider sprinkling sand on top or adding wood cleats.Boost Seedling Growth with CreativityFor gardening lovers, plywood can be transformed into seed-starter carts complete with wheels. This innovation allows you to move your seedlings toward sunlight, especially during still-cold spring months. Interior designer Eric Goranson advocates using birch plywood for its smooth finish, making it a canvas for paint that complements any decor. It’s an inspiring way to nurture plants and add a personal touch to your gardening experience.Organize Your Mudroom Like a ProAre you tired of wet boots and chaotic gear cluttering your entryway? Custom storage solutions built from plywood can eliminate soggy floors and optimize your space. Goranson suggests finishing your project with polyurethane sealant to promote longevity and prevent mold. You can create designated areas for each item, ensuring your mudroom remains functional and welcoming.Unleash Your Artistic SidePlywood provides an excellent medium for DIY art projects. Whether you want to paint or assemble sculptures, its unique texture adds a rustic charm to any piece. Home painting expert Carr Lanphier notes that repurposing leftover plywood can lead to stunning wall art that reflects your tastes. Many tutorials online cater to various skill levels, ensuring that anyone can partake in this creative outlet.Soundproof Your Space with Acoustic PanelsIf noise disrupts your creative space, plywood can serve as an effective acoustic panel solution. DIY enthusiast Cody Schuiteboer achieved remarkable results in his home recording studio with 3/4” plywood panels layered with acoustic foam. To maximize sound dampening, consider staggered panel heights or varied widths for a design that not only serves a purpose but also looks appealing on your walls.Create Cost-Effective Skateboard RampsFor parents or skateboard enthusiasts looking to build a ramp without breaking the bank, plywood is the answer. Schuiteboer constructed a skateboard ramp for his son using 1/2” plywood, offering an enduring surface without the hefty price tag of commercial ramps. He further enhanced the ramp with a smooth plastic coating to improve glide, showcasing how plywood can provide both functionality and fun.Additional Creative ApplicationsPlywood's capabilities extend even further. It can be used to form concrete, create elaborate furniture pieces, or construct temporary walls for home improvement projects. Embracing its attributes can lead to innovative solutions for common household challenges, proving that a little creativity paired with plywood can go a long way.Why Plywood Stands Out Among MaterialsThe multilayered construction of plywood not only ensures stability and strength but also allows it to be worked with relative ease, making it a go-to material for both amateurs and seasoned DIYers. Focusing on its multifunctional nature helps redefine how we perceive this material—no longer just for construction but rather as a tool for artistic expression and practical solutions.Get Started on Your Own Plywood ProjectWhether you're an avid DIYer or just exploring the wonders of home improvement, incorporating plywood into your projects opens a world of creativity and functionality. The next time you're considering materials for a new project, don't overlook plywood's potential. With the right tools and a bit of imagination, you can create stunning and useful pieces that enhance your living space.

Terms of Service

Privacy Policy

Core Modal Title

Sorry, no results found

You Might Find These Articles Interesting

T
Please Check Your Email
We Will Be Following Up Shortly
*
*
*