Add Row
Add Element
UPDATE
Add Element
  • Home
  • Categories
    • Cleaning & Moving
    • Maintenance / Repairs
    • Remodeling & Construction
    • Landscaping / Outdoor
    • Security & Technology
    • Sustainability, Health & Safety
    • Interiors / Décor
    • Expert Interviews
    • DIY Home Projects
Home Wise News!
Wise Insights, Reliable Contractor Advice & Hands on DIY Know How for Savvy Homeowners
June 11.2025
3 Minutes Read

Discover How to Clean a Mattress with Baking Soda for Better Sleep

Vacuuming a mattress in a bright room; essential step before cleaning with baking soda.

Unlocking the Secrets: How to Clean a Mattress with Baking Soda

Are you tired of waking up every morning to a mattress that possesses a mysterious assortment of crumbs, stains, and odors? Well, fear not! Cleaning your mattress doesn't require a degree in advanced chemistry or a hefty investment in cleaning supplies. With a few common household items, particularly the magic ingredient known as baking soda, your mattress can once again become a place of comfort.

Why Baking Soda?

Baking soda isn’t just for baking cookies; it’s an ancient cleaning agent that’s affordable, non-toxic, and effective. This simple white powder helps to neutralize odors while acting as a gentle abrasive, which makes it ideal for cleaning various surfaces. Given its ability to absorb moisture and odors, it’s no wonder that it earns its place in the cleaning arsenal of many households.

The Step-by-Step Guide to Mattress Cleaning

Ready to get started? Here’s a step-by-step guide:

  1. Strip the Bed: Remove all sheets and bedding from your mattress. Give it some space to breathe.
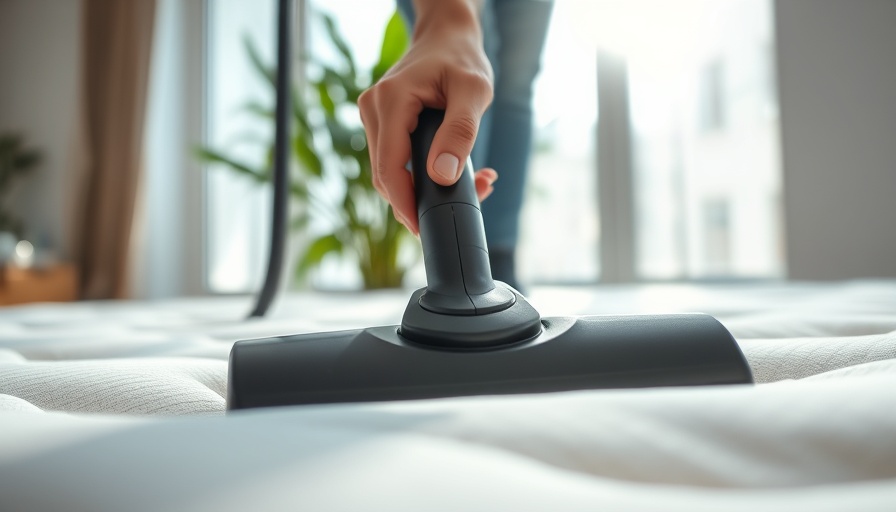
  2. Vacuum Your Mattress: Dust and debris can be quite the party crashers. Use a handheld vacuum or an upholstery attachment to get rid of dust mites and other annoying particles.
  3. Shake and Scrub: Now for the fun part! Sprinkle a generous amount of baking soda over your mattress. For added effect, mix in a few drops of your favorite essential oil to eliminate odors and create a soothing scent.
  4. Let It Sit: Patience is a virtue. Allow the baking soda to work its magic by sitting for at least 15-30 minutes. This gives it enough time to absorb all those unwanted odors.
  5. Vacuum Again: Using your vacuum, go over the mattress again to suck up the baking soda. Voila! You’ve helped your mattress regain its freshness.
  6. Protect Your Mattress: Invest in a breathable mattress protector to keep it clean and fresh for longer.

Embracing Sustainability Preparedness

In a world where cleaning products often contain harsh chemicals, baking soda represents an eco-friendly alternative. It’s biodegradable, safe for health, and presents no risk of chemical irritation. By opting for such natural cleaning agents, we contribute significantly to our planet's health while also preserving our home's safety.

Advantages of Using Essential Oils

Imagine snuggling into bed, surrounded by a calming lavender breeze. That’s the result of mixing essential oils with baking soda. When you incorporate essential oils, you not only enjoy a fresh-smelling mattress, but you also tap into the therapeutic properties of these oils. For instance, eucalyptus promotes relaxation, while peppermint boosts energy. Learning about such natural remedies can transform the mundane task of cleaning into a self-care ritual.

Common Misconceptions About Mattress Cleaning

Many believe that mattresses are immune to dirt and can go long periods without cleaning. This couldn’t be further from the truth. Dust mites thrive in our mattresses, and without regular maintenance, we risk compromising our health and quality of sleep. Regular cleaning helps prevent allergies and improves indoor air quality.

Final Thoughts: Clean Mattress, Happy Life

Cleaning your mattress may not be the most glamorous chore in the house, but it’s undoubtedly one of the most rewarding. With just a sprinkle of baking soda and some routine maintenance, you can ensure that your mattress remains a clean, comfortable oasis. It’s not just about aesthetics; a clean mattress directly impacts your sleep quality, which in turn affects your overall health and well-being. So roll up your sleeves, grab that baking soda, and make your mattress the cozy haven it deserves to be!

Take cleaner sleep to the next level—begin your mattress rejuvenation today!

Cleaning & Moving

0 Comments

Write A Comment

*
*
Related Posts All Posts
02.14.2026

Transform Your Bathroom with These Grout Cleaning Techniques

Update SEO Keyword: Grout Cleaning Techniques That Transform Your Bathroom The quest for a spotless bathroom often begins with one of the most neglected areas: the grout. Cleaning grout might sound like a mundane task, but with the right techniques, you can turn this cleaning chore into a sparkling success. So, roll up your sleeves, and let’s dive into the world of effective grout cleaning! Understanding the Importance of Clean Grout Grout plays a crucial role in your bathroom, acting as a seal between tiles and preventing water from seeping into gaps. However, due to its porous nature, grout can easily attract dirt, mold, and mildew, converting your beautiful tile work into an eyesore. Here’s why investing time in cleaning your grout is not just a cosmetic necessity but a functional one as well. Picks and Tricks: Diverse Techniques for Grout Cleaning Let's dispel the myth that cleaning grout has to involve harsh chemicals and hours of scrubbing. Here are some simple yet effective methods to get your grout back to its prime: Baking Soda Paste: Combine baking soda with water to create a thick paste. Apply it to the grout lines and let it sit for 10-15 minutes before scrubbing with a soft brush. Vinegar and Water Solution: Mix equal parts of vinegar and warm water in a spray bottle. Spray it on the grout after applying the baking soda paste, which will create a fizzing reaction that lifts stains. Oxygen Bleach: For tougher stains, oxygen bleach can be a game-changer. Mix with water and apply for a longer duration before scrubbing. Innovations in Grout Cleaning Technology In our current age of smart technology, gadgets aren’t just for convenience; they can also simplify your cleaning routine. Ultrasonic cleaners, for instance, use high-frequency sound waves to dislodge dirt and grime effectively without any scrubbing. For the tech-savvy, employing these devices can save both time and energy, while ensuring that your grout receives a deep clean. A Few Tips to Maintain Your Grout Once you’ve achieved that sparkling clean grout, it’s essential to maintain it. Regular cleaning is key; ensure that you wipe your tiles and grout down weekly to prevent any buildup. Additionally, consider using a grout sealer after cleaning to minimize future stains and make maintenance easier. Common Misconceptions About Grout Cleaning One misconception is that all grout is alike. In reality, the type of grout can significantly affect how you should clean it. Epoxy grouts, for instance, are more resistant to staining than cement-based grouts and often don’t require as aggressive cleaning methods. Knowing the type of grout you have can save you from damaging it during the cleaning process. Emotional Attachments: Our Love-Hate Relationship with Cleaning Cleaning can often evoke a mix of emotions; for some, it’s therapeutic, while for others, it feels like a necessary evil. However, consider the sense of satisfaction that comes after your grout looks brand new. Takes a little time, sure, but the payoff is worth it! The Bottom Line: Grout Cleaning Simplified Transforming your bathroom from grimy to gleaming doesn't have to be daunting. With the right techniques and support from innovative cleaning technology, tackling grout can become a manageable task. So, armed with these tips and tricks, go forth and let your bathroom shine! Remember, a little elbow grease goes a long way, and keeping your grout clean is a step towards a healthier, more inviting home!

02.13.2026

How to Effectively Clean Mold from Your Toilet Base: A Comprehensive Guide

Update Why Mold in Your Toilet Base is a Bigger Issue Than You Think Finding mold in your toilet base can be unpleasant, but did you know that it's also a potential health risk? Mold spores can trigger allergies, respiratory problems, and even more severe issues for those with weakened immune systems. Understanding why this happens can motivate you to take timely action. Mold thrives in damp environments, and the toilet base, with its mixture of warm air and moisture, creates an ideal breeding ground. Identifying the Right Tools for the Job Cleaning mold effectively requires the right tools and cleaning agents. While bleach is often the go-to solution, there are alternatives that are safer for the environment and your health. Consider using vinegar, baking soda, or commercial mold removers that label themselves as eco-friendly. You’ll also need gloves, a scrub brush, and some elbow grease! Depending on the severity of the mold, a good sponge or hard-bristle brush may be necessary to scrub away those stubborn spots. A Step-by-Step Guide to Cleaning Mold from Your Toilet Base Before you dive into cleaning, it's crucial to gather all your materials. Make sure to ventilate the bathroom by opening windows or using a fan. Here’s a simple step-by-step plan for cleaning that mold away: Step 1: Empty the Area - Remove all items around your toilet to create ample space. Step 2: Apply the Cleaning Solution - Spray your chosen cleaner generously on the moldy areas. Allow it to sit for at least 10-15 minutes to really soak in. Step 3: Scrub Away - Use your brush or sponge to scrub at the mold. Don’t hold back! You want to ensure you remove as much as possible. Step 4: Rinse and Dry - Wipe down the area with a clean, damp cloth and then dry it thoroughly to prevent future mold growth. Step 5: Dispose of Waste Properly - Don’t forget to remove your gloves and any materials used in the process to avoid spreading mold spores elsewhere in the house. The Importance of Regular Maintenance Consider making toilet cleaning a regular part of your cleaning routine. Setting a schedule to check for mold can prevent larger issues down the line. Maintaining your bathroom's humidity by keeping it well ventilated and using dehumidifiers can also help reduce the chances of mold returning. Alternative Strategies and Tips for a Mold-Free Toilet Aside from deep cleaning, integrating some everyday strategies can help keep your toilet base mold-free: Educate Yourself - Know the signs of mold and stay vigilant. Early detection is key! Invest in Technology - Smart home devices that monitor air quality can alert you to higher humidity levels. Eco-Friendly Products - Use natural cleaning products that not only clean but help maintain healthy air quality. Conclusion: Tackling Mold One Toilet at a Time Tackling mold in your toilet base doesn’t have to be a daunting task. With the right knowledge and tools, you can ensure your bathroom remains in peak condition. Remember the importance of being proactive in your cleaning habits. So get out there, gather your tools, and make mold a thing of the past!

02.12.2026

Can Dryer Sheets Really Freshen Up Your Microwave? Find Out Now!

Update The Surprising Truth About Dryer Sheets and Microwaves You've probably heard the urban legend that dryer sheets can freshen up your microwave, a notion that seems too easy to be true. With modern cleaning products available at your fingertips, it appears sacrilegious to consider a simple laundry accessory for tackling microwave gunk. But what if there’s some merit to this seemingly silly idea? Buckle up as we explore just how effective dryer sheets can be in not only cleaning your microwave but also elevating your cleaning game in the kitchen! The Science Behind Dryer Sheets First, let’s get a grip on what these laundry room warriors are actually made of. Dryer sheets contain a mix of fabric softeners, fragrances, and other chemicals that can reduce static cling. This begs the question: can these ingredients do more than just pamper your laundry? The softening agents can aid in loosening dirt and grime when combined with moisture, making it plausible that they could help in tackling uh… yesterday’s leftovers that have become one with your microwave. How to Use Dryer Sheets to Clean Your Microwave If you’re feeling adventurous and want to give this a try, it's pretty simple! Just fill a microwave-safe bowl with water and toss in a couple of dryer sheets. Heat the mixture for about five minutes, allowing steam to form. This steam will help to loosen any stubborn food particles inside. Wipe everything down with a cloth, and voilà! You’re left with a fresh-smelling, clean microwave. However, remember to rinse the interior with plain water afterwards to ensure no residues are left behind! Comparing Methodologies: Dryer Sheets vs. Conventional Cleaning Agents It’s always good to weigh your options. Dryer sheets can be a nifty trick in a pinch, but don’t entirely replace traditional cleaning methods. Commercial microwave cleaners and a mix of vinegar and water also get the job done without the worry of chemical residues. The dryer sheet method may offer a delightful scent, but does it really clean as effectively as its competitors? Some cleaning experts argue that the fragrances can mask odors rather than eliminate them, leaving behind particles that may contribute to future gunk build-up. What the Experts Are Saying The cleaning world is full of advice, often conflicting. Some cleaning experts endorse the dryer sheet hack, praising its ability to freshen without the elbow grease. However, others suggest that while dryer sheets may loosen grime, they can sometimes leave behind residues that create even more buildup over time. Thus, it may be wise to consider this method as a supplement to, rather than a substitute for, traditional cleaning practices. Real-Life Applications and Anecdotes Many users of this hack have reported varying levels of success, with some swearing by it as a modern-day miracle and others left feeling underwhelmed. Consider one user who boasted that the first use transformed their old, neglected microwave into a fragrant oasis. Another, however, noted that while their microwave smelled delightful, remnants of cheese still refused to budge. If you choose to engage in this experiment, be prepared for the mixed reviews! Modern Cleaning Trends: Is There a Place for Dryer Sheets? As we embrace innovations in cleaning technology and smarter solutions, it’s interesting to see how such conventional tools fit into our modern lifestyle. With busy schedules and an abundance of cleaning products, the draw of a simple and effective hack is undeniably attractive. However, as we lean into sustainability, the reliance on products filled with various chemicals calls for a cautious approach. Therefore, consider balancing the use of dryer sheets with eco-friendly alternatives like baking soda or vinegar, which are gentler on our planet. Final Thoughts: The Verdict So, can dryer sheets freshen up your microwave? Yes, but with a few caveats. It can be a fun, easy method to try, especially if you find yourself in need of a quick fix. Always ensure you’re also relying on deep cleaning techniques regularly to maintain that microwave in tip-top shape. Ultimately, experiment and see what works for you, but never underestimate the hugs offered by tried-and-true cleaning agents. At the end of the day, a clean microwave is a happy microwave, regardless of the methods we choose! Next time you tackle kitchen cleanliness, don’t forget to explore all your options. You might find a newfound love for DIY cleaning hacks that make daily chores less of a chore!

Terms of Service

Privacy Policy

Core Modal Title

Sorry, no results found

You Might Find These Articles Interesting

T
Please Check Your Email
We Will Be Following Up Shortly
*
*
*