UPDATE
  • Home
  • Categories
    • Cleaning & Moving
    • Maintenance / Repairs
    • Remodeling & Construction
    • Landscaping / Outdoor
    • Security & Technology
    • Sustainability, Health & Safety
    • Interiors / Décor
    • Expert Interviews
    • DIY Home Projects
Home Wise News!
Wise Insights, Reliable Contractor Advice & Hands on DIY Know How for Savvy Homeowners
September 09.2025
3 Minutes Read

Master the Art of House Wrap Installation with These Essential Tips

Worker installing house wrap tips for a secure, effective fit.

The Importance of Proper House Wrap Installation

Installing house wrap may not seem like the most exciting part of home improvement, but its significance cannot be overstated. Proper house wrap installation is vital for creating an energy-efficient barrier in your home that protects against the elements. Without it, you risk serious water damage, mold growth, and costly repairs down the line. This article aims to provide essential tips sourced from industry best practices and expert opinions to simplify this crucial task.

1. Choose Quality House Wrap

When embarking on your house wrap project, selecting the right product is the first step to success. Avoid cheap alternatives that have low perm ratings, typically around eight to twelve. These can lead to moisture issues as they allow vapor to build up, which can condense and result in dampness within your walls. Instead, opt for high-quality wraps like Tyvek, rated at approximately 54 perm, that enhance moisture control while optimizing energy efficiency.

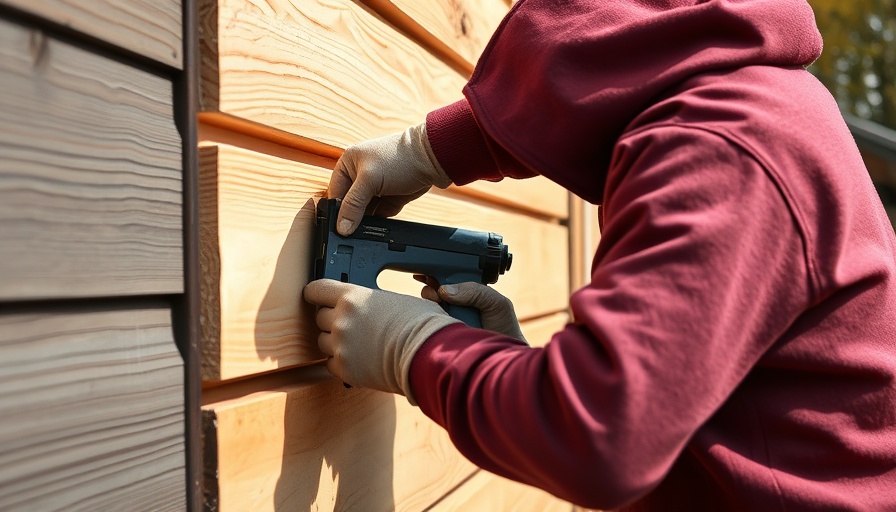
2. Utilize Cap Nails for Secure Fastening

Modern construction standards have evolved, and so have fastening methods. Gone are the days of hammer tackers; instead, today’s house wraps are best installed using cap nails or cap staples. This might seem cumbersome, but the benefits outweigh the drawbacks. Cap fasteners secure the wrap 25 times better than staples alone, ensuring it stays put during severe weather conditions.

3. The Efficiency of The Stinger Tool

Hand-nailing cap fasteners might work in a pinch, but it’s not the most efficient method for DIYers. Consider using a tool like the Stinger® Cap Staple Hammer. This innovative tool is designed for the task, allowing you to drive cap nails easily, speeding up installation while maintaining the high standards necessary for effective water and wind protection.

4. Create a Wind-Tight Seal with Overlapping

Proper overlap is essential in maintaining a wind-tight seal. When installing the house wrap, ensure that every vertical application overlaps by at least six inches. This allows water to shed properly, directing it away from vulnerable spots. Following this practice can prevent leaks and prolong the life of your walls.

5. Wrapping Around Windows and Doors

Special attention should be paid to windows and doors. Wrap these areas thoroughly, making sure to cut slits that allow the wrap to fit snugly around the frames. This tight seal will prevent air from leaking in or out, ensuring maximum efficiency and comfort inside your home.

6. The Aftermath of Installation

After successfully installing your house wrap, it’s crucial to inspect your work before moving onto siding or other exterior finishes. Check for gaps, loose sections, or any areas that may need revisiting. This diligence saves money and time in the long run by averting potential damage.

7. The Role of House Wrap in Energy Efficiency

Understanding the impact of house wrap on your home's overall energy efficiency can encourage homeowners to take this installation seriously. By preventing air leaks, house wrap enhances your homes' insulation, leading to lower heating and cooling costs. It's a straightforward improvement that pays dividends in comfort and cost savings.

8. Planning for Different Climatic Conditions

Not all homes require the same approach to house wrap. Depending on your geographic location, consider the local climate when selecting materials. Areas with high moisture levels may require additional moisture barriers, while dry climates can focus more on vapor barriers for insulation. Tailoring your approach ensures the best performance.

9. Adhering to Building Codes

Always consider local building codes and regulations when installing house wraps. Compliance is essential not just for legal compliance but for ensuring your work meets safety standards. This practice helps avoid problems during inspections and ensures the longevity of your installation.

10. Common Misconceptions About House Wraps

Many homeowners believe that all house wraps are created equal, but that couldn't be further from the truth. Understanding the differences in material types, perm ratings, and installation techniques can shift your perspective and motivate you to invest wisely in materials.

In conclusion, equipping yourself with these handyman tips and DIY projects knowledge regarding house wrap installation not only boosts your skills but also preserves the quality of your home. For safe and effective home repairs and maintenance projects, always prioritize quality materials and practices. By investing time and effort in these essential preparations, your home will be well-guarded against the elements for years to come.

Maintenance / Repairs

0 Comments

Write A Comment

*
*
Please complete the captcha to submit your comment.
Related Posts All Posts
06.10.2026

How to Effectively Handle a Rat Infestation in Your Attic

Update Why a Rat in Your Attic is More Than Just an AnnoyanceFinding a rat in your attic can transform your idyllic living space into a source of anxiety. With the potential for damage and disease, addressing this issue promptly is crucial. Rodents often seek out homes not just because of warmth and shelter, but due to easily accessible food sources. This article explores effective DIY remedies and professional solutions for handling rat infestations, bolstered with the expertise of pest control professionals.The Initial Dread: Understanding the InfestationWhen Lindsay and her husband first noticed the scratching sounds, they likely dismissed it as a benign nuisance. However, rats can cause serious structural problems and health risks, making it essential to act fast. According to pest control expert Nicole Carpenter, even one rat can lead to a wider infestation if not dealt with immediately. The physiological traits of rats allow them to squeeze through surprisingly small openings. Hence, keeping an eye out for these vulnerabilities in your home is vital to preventing entry.DIY Solutions: What Works and What Doesn'tInitially, Lindsay attempted to solve her problem with standard mouse traps, which proved futile. This highlights the common misconception that all rodents are the same. According to the Family Handyman, using traps that cater specifically to the size and agility of your foe can save you time and frustration. Larger snap traps are more effective for catching bigger rodents, and expert Kyle Turner suggests baiting these traps with not just peanut butter but also bacon or nesting materials for maximum success.Expert Insights: When to Call in the ProfessionalsWhile DIY solutions can be effective, some infestations can spiral beyond a homeowner's control. When the problem becomes overwhelming, as evidenced in Lindsay's case, engaging a pest control service may become necessary. Pest control professionals possess specialized knowledge and tools, such as rodent exclusion products and removal techniques that can mitigate the problem quickly and efficiently.Humane Options: Advanced Strategies in Pest ControlFor those concerned about the ethics of traditional traps, humane catch-and-release traps present an alternative. These traps allow for safe capture without hurting the animal, later enabling you to release it far from your home. However, it's important to check local laws regarding rodent relocation, as regulations vary.Preventive Measures: Securing Your HomeEffective pest control is not just about extermination—it's equally about prevention. Ensuring that your home is properly sealed can significantly diminish the chances of a recurring rat problem. Blocking entry points around drainpipes, windows, and cracks in the foundation will go a long way in keeping your living environment safe from unwanted guests.Home Remedies: Success Through Natural SolutionsHousehold items can serve as surprisingly effective deterrents. Articles such as peppermint oil, which rats dislike, can be sprinkled at potential entry points. Additionally, using hot pepper flakes as a barrier ensures that these unwelcome guests think twice before entering. The Times of India offers other interesting home remedies using instant potatoes and other common ingredients that might be lurking in your pantry.Conclusion: Taking Control of Your SpaceDealing with a rat infestation can be a daunting task, but with the right strategies, there’s hope to reclaim your home. Whether through DIY methods or professional help, the key is to act decisively. Make your home unfriendly for rats by removing food sources and sealing entry points. Remember, a proactive approach today can prevent a sleepless night tomorrow.For those looking to learn more about preserving home integrity and ensuring safety, consider diving deeper into resources about home maintenance, tips on pest control, and effective DIY projects for a healthier living environment.

06.09.2026

Silencing That Squeaky Door: A Homeowner's DIY Guide

Update Understanding the Squeak: What Causes Door Noise? As homeowners, we often overlook the little sounds that come from around the house, but a persistent squeak can become more than just a nuisance. Understanding what causes these sounds is the first step in addressing them. Generally, the most common culprit is inadequate lubrication of the hinges. When the lubricating oil wears off, the hinge metal rubs against itself, creating an irritating squeak that can disrupt your peace. Additionally, misalignment of the door can exacerbate this issue, as it causes unnecessary strain on the hinges. Gathering Your Tools: What You Need to Fix Squeaky Doors Before you dive into fixing that annoying door, gather the necessary tools to ensure a smooth process. Here’s a basic toolkit for this DIY project: Screwdriver: A Phillips or flathead screwdriver (depending on your screws). Lubricant: Household lubricant like WD-40 or silicone spray works wonders. Rags: To clean any residue and to catch any drips. Door Shims: If your door needs shimming to align properly. Having these items on hand can save you time and frustration as you tackle the noise. Step-by-Step Guide: How to Quiet Your Squeaky Door Now that you're prepared, let’s walk through the steps to fix your squeaky door: 1. Inspect the Hinges Start by examining the hinges. Look for signs of rust or wear, which could indicate that a replacement is needed. If they seem in decent shape, wipe them down to remove dirt and grime. 2. Apply Lubricant Next, apply your lubricant of choice. For WD-40, simply spray a bit onto the hinge and allow it to soak in. For grease-based lubricants, use your finger or a small brush to apply it directly where the hinge pivots. Don’t forget to wipe any excess to prevent dust from attracting. 3. Test the Door Open and close the door several times to ensure the squeak is gone. Sometimes, a door needs a few openings to work lubricant into the hinge properly. If the noise continues, you may need to consider realigning the door. 4. Checking Alignment If lubrication does not solve the issue, check if the door is hanging properly. Misalignment can cause undue pressure on the hinges. Use your screwdriver to adjust the screws on the hinges; tightening or loosening can often resolve alignment issues. 5. Clean Up Finally, it’s time to wrap things up. Use your rags to wipe down any excess lubricant to keep your door frame and surroundings clean. Future Proofing: Keeping Your Doors Squeak-Free Once you've successfully silenced that squeaky door, consider some maintenance tips to keep it that way: Regularly check and lubricate door hinges every 6 months. Avoid letting dirt and debris accumulate around hinge areas. If your door seems to sag, adjust hinges promptly to prevent unified strain. Proactive maintenance can help you avoid those irritating squeaks from returning. When to Call in the Pros Sometimes the squeaks in your home could indicate deeper issues beyond hinges. If you can’t resolve the noise with traditional methods or if adjusting the hinges leads to further complications, it might be time to consult a professional. Consider it a wise investment to ensure your home remains a peaceful haven. The DIY Advantage Repairing squeaky doors can save homeowners a small fortune. It empowers you to take control of your home maintenance, often using tools and materials that are already at your fingertips. Every project completed adds not only value to your home but also boosts your confidence in tackling future repairs. If you're interested in more DIY home improvement tips and tricks like these, join our community of homeowners dedicated to making their spaces vibrant and functional!

06.09.2026

Unveiling the Sleeping Porch Revival: Why You Need This Vintage Feature

Update Rediscovering the Charm of Sleeping Porches Once a hallmark of early 20th-century homes, sleeping porches are making a surprising comeback. Originally designed as a remedy for ailments like tuberculosis, these airy sanctuaries were celebrated for their health benefits, allowing individuals to sleep in fresh, outdoor air. Today, as the world leans towards sustainability and a deeper connection with nature, sleeping porches are resurrecting within modern architectural design, combining nostalgia with innovative concepts. A Breath of Fresh History The early 1900s witnessed a unique health movement that advocated for fresh air as a pivotal remedy. Addressing public health crises like tuberculosis, designers integrated sleeping porches into home layouts to promote better sleep and health. Brooklyn homeowners often coveted these spaces and advertisements of the time showcased them alongside electrical systems and running water, indicating their perceived importance. These porches featured large, operable windows—key to maximizing fresh air flow—and were typically placed on upper stories for optimal exposure. Reasons Behind the Revived Interest Fast forward to today, and the sleeping porch is being embraced once again. The allure of spending nights under the stars while enjoying the restorative benefits of a cool breeze has captivated homebuyers and remodelers alike. The increasing focus on mental health and well-being forces us to reconsider how our living spaces affect our lives. With this resurgence, many are opting to enhance existing porches or create new spaces that serve multifunctional purposes. The Modern Sleeping Porch: Blending Old with New Today's sleeping porches no longer have to adhere strictly to their historical counterparts. Homeowners are integrating elements like screens, comfortable furniture, and outdoor-centric décor to enhance comfort while maximizing airflow and aesthetics. Technology also plays a role; smart home systems can regulate temperatures and lighting to create the perfect sleeping environment. They're no longer just about fresh air, but rather a space for relaxation, meditation, and family bonding. Transformative Tips for Creating Your Sleeping Porch For those looking to add a sleeping porch into their home, here are a few actionable insights: Design for Flexibility: Create a flexible design that allows for multiple uses, whether it’s a tranquil sleeping area, a reading nook, or a seasonal gathering spot. materials Matter: Select weather-resistant materials that complement the house’s aesthetics while ensuring durability. Prioritize Airflow: Incorporate features that enhance airflow, such as strategic window placements, ceiling fans, or even retractable screens to keep out pesky bugs. Health Benefits of a Sleeping Porch: Why You Should Care Research continues to affirm the health benefits of fresh air and quality sleep. Sleeping outdoors improves air quality exposure while reducing stress and fostering relaxation. In an era where indoor living has become the norm, reintroducing such spaces could positively impact mental health. Imagine falling asleep to the sound of rustling leaves instead of city noise—priceless! Conclusion: Embrace the Vintage Vibe for a Modern Era In a rapidly modernizing world, the appeal of the sleeping porch is more than just nostalgia; it represents a growing desire to reconnect with nature. Whether you’re renovating an old home or building anew, consider integrating a space that champions both comfort and redefines how we interact with our environment. In a time where health and wellness are paramount, the sleeping porch stands as a bridge between past practices and contemporary needs.

Terms of Service

Privacy Policy

Core Modal Title

Sorry, no results found

You Might Find These Articles Interesting

T
Please Check Your Email
We Will Be Following Up Shortly
*
*
*