Add Row
Add Element
UPDATE
Add Element
  • Home
  • Categories
    • Cleaning & Moving
    • Maintenance / Repairs
    • Remodeling & Construction
    • Landscaping / Outdoor
    • Security & Technology
    • Sustainability, Health & Safety
    • Interiors / Décor
    • Expert Interviews
    • DIY Home Projects
Home Wise News!
Wise Insights, Reliable Contractor Advice & Hands on DIY Know How for Savvy Homeowners
May 31.2025
4 Minutes Read

Transform Your Attic: 13 Ideas for Stylish Upgrades

Modern attic space upgrade ideas: Cozy bedroom with skylights.

Unlock the Potential of Your Attic: Innovative Ideas That Inspire

Your attic doesn't have to remain a forgotten space filled with dusty boxes. With a splash of creativity and the right tools, it can be transformed into a stylish and functional part of your home. Whether you're looking to add value, create much-needed space, or simply beautify your home, upgrading your attic is a smart choice. This guide dives into 13 unexpected attic spaces that you’ll adore.

Maximizing Attic Storage with Built-In Solutions

One of the greatest advantages of transforming your attic is the opportunity for built-in storage. Utilize low gable walls and the angles created by steep-pitched roofs to install shelves, cabinets, and other storage solutions that keep your space organized.

Consider how built-in storage can not only house your belongings but also serve as stylish design features. For example, bookshelves can double as safety rails, combining form and function while adding an aesthetic appeal. This approach ensures that even the most awkward spaces are used effectively.

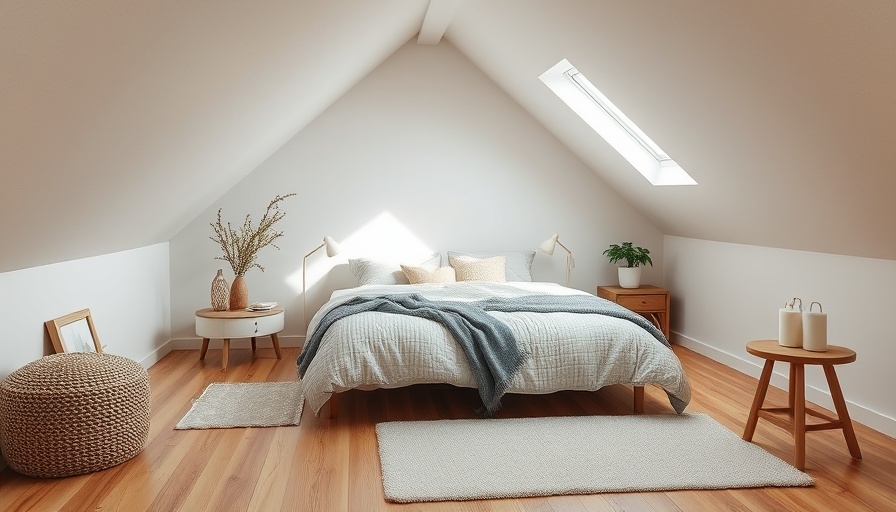
Illuminating Your Attic: The Importance of Natural Light

Even the darkest attics can shine with the right lighting choices. If your attic lacks windows, consider light paint colors, recessed lighting, and sheer window treatments to create an airy feel. These elements can visually expand the space and make it feel inviting.

Moreover, strategically placed mirrors can reflect light around the room, improving its brightness and ambiance. This simple trick can make your attic a place where you want to spend time, whether it’s a cozy reading nook or a vibrant home office.

Create a Luxurious Bathroom Retreat

Did you know that your attic space can accommodate a chic bathroom? Depending on the height available, you can cleverly design an elegant bathroom that offers both functionality and style. Using the highest ceiling point for a full shower allows you to maximize space effectively.

Smart placement of fixtures will ensure you maintain flow and comfort, making even the smallest spaces feel luxurious. Pairing thoughtful layout decisions with beautiful finishes will result in a stunning retreat.

Separation Techniques: Defining Your Attic Space

For those looking to create distinct areas within their attic, consider partitioning the space. This can effectively hide clutter or give privacy to different functions—be it a workspace, relaxation area, or sleeping nook.

Partitions don't have to be permanent; they can be screen dividers, bookshelves, or curtains that let you adjust the openness of your space as needed. This versatility fosters an adaptable environment suitable for various activities.

Building an Entrance That Wows

Enhance your attic's entrance with space-saving pull-down stairs that add a touch of intrigue. This thoughtful design choice not only conserves space but also ensures safety when accessing upper areas. Oftentimes, the journey to a transformed attic begins here, so make it as inviting as the space itself.

Create an Enchanting Playroom

For families, an attic can become the ultimate playroom. Allow your children's imaginations to run wild in a whimsical space filled with toys, games, and creativity. You might consider colorful themes, creative decor, and multifunctional storage solutions that keep the space organized.

This kind of playroom can inspire joy, creativity, and bonding among family members, making the attic a cherished space in your home.

Elevate Your Reading Experience with a Nook

Picture this: a cozy reading nook in your attic, complemented by plush seating and warm lighting. Imagine curling up with your favorite book in a serene environment. This can be achieved by cleverly designing a corner that captures natural light and maximizes comfort.

Incorporate built-in bookshelves to not only store literary treasures but also enhance the decor with style. The right elements will celebrate your love of reading while creating an inviting escape.

Embracing the Unique Features of Your Attic

Your attic's beams and trusses tell a story of craftsmanship and architecture. By embracing these features rather than hiding them, you can create a warm, rustic atmosphere that enhances your home's character.

Incorporate features like exposed beams or original woodwork into your design aesthetic. These elements not only add visual interest but also connect your attic to the history of your home.

DIY Projects for Affordable Attic Upgrades

For the hands-on homeowner, the prospect of transforming your attic can also be an opportunity to engage in DIY projects. Follow tutorials and guides on constructing shelves, creating partitions, or adding finishes yourself to keep costs down while adding personal flair.

Building your own furniture or storage solutions fosters a sense of accomplishment and can often result in unique pieces tailored specifically to your space.

Realizing the Value of Your Attic Upgrade

Investing in your attic yields meaningful returns, whether through increased property values or enhanced daily life quality. Consider the potential for your attic when planning a renovation; think not only of aesthetics but also of the space's utility.

As you contemplate upgrading your attic, weigh the options that best suit your needs and lifestyle, ensuring a seamless and valuable integration into your home.

Now’s the time to explore the creative possibilities that your attic holds!

DIY Home Projects

0 Comments

Write A Comment

*
*
Please complete the captcha to submit your comment.
Related Posts All Posts
04.10.2026

How to Clean Walls Without Damaging Paint: Easy Techniques Every Homeowner Should Know

Update Effortlessly Restore Your Walls with These Proven Techniques Keeping your walls clean is essential for maintaining a pleasing atmosphere in your home, especially since it's one of the first things guests notice. However, the last thing you want to do is damage your freshly painted walls while trying to wipe away dust, grease, or marks. Luckily, thanks to insights from paint experts, there are easy, safe methods to ensure your walls remain pristine without losing their color or sheen. Choosing the Right Approach: Know Your Paint Finish The first step in cleaning painted walls without jeopardizing the finish is to know the type of paint used. For example, walls painted with higher gloss finishes—like semi-gloss or satin—are generally more forgiving during cleaning. In contrast, matte and eggshell finishes require a gentler touch to avoid damage. Benjamin Moore’s Regal® Select Interior paint is known for its stain-resistive properties and cleans well, making it an excellent choice for high-traffic areas. Gather Your Supplies: Preparation is Key What you'll need: Non-abrasive sponges or cloths Lukewarm water Mild dish soap or an all-purpose cleaner Two buckets—one for cleaning solution and another for rinsing Rubber gloves Soft, absorbent towels Before diving into the cleaning, ensure that all necessary tools are gathered. Cover the floors to catch any drips, and dust the walls with a vacuum’s brush attachment to avoid pushing dirt around. Start Simple: The Power of Water Your first line of attack should be warm water. Simply dampen a non-abrasive sponge and wipe gently. If you're dealing with light stains, this might be all you need to restore the wall's beauty. Always wipe from the bottom upward to prevent streaking from running grime. When to Step It Up: Using Mild Cleaning Solutions If warm water doesn’t do the trick, mix together a few drops of mild dish soap with lukewarm water. The soap helps lift the grime without the harsh chemicals found in many cleaners. When applying, work in small sections, using a circular motion to minimize the risk of damaging the paint. What If the Stains Persist? Try Natural Alternatives For stubborn stains that refuse to budge, a paste made from baking soda and water can work wonders. Apply it to the stained areas and scrub gently with a soft cloth. Baking soda acts as a gentle abrasive and can eliminate marks while being safe for painted surfaces. Don't Forget the Final Touch: Drying and Finishing Once you’ve cleaned the walls, don’t overlook the importance of drying them properly. Use a soft and absorbent cloth to ensure all moisture is absorbed, preventing the risk of mildew forming. A clean wall should feel smooth and look fresh—just like when you first painted it! Establish a Routine: Maintenance for Longevity Incorporating wall cleaning into your regular maintenance routine is important. Regular dusting and periodic washes can significantly extend the life of your paint job. Take note that freshly painted walls should typically be left for at least two weeks before any cleaning is done to allow the paint to cure properly. Conclusion: Transform Your Home’s Ambiance with Care Cleaning your walls doesn’t have to be a daunting task. By following these easy, safe methods, you can maintain the charm of your living space without damaging your paint. The next time you notice fingerprints or dirt on your walls, you’ll be well-equipped to tackle the mess and keep your home looking polished! Don't forget to share your experiences or any additional tips you’ve learned along the way!

04.09.2026

Master the Art of Cleaning Saw Blades and Router Bits with Ease

Update Reviving Your Tools: The Importance of Cleaning Keeping your saw blades and router bits clean is not just about maintaining tools but optimizing performance. A blade dulled by pitch and grime can dramatically reduce efficiency and invoke unnecessary wear on motors. The old saying, "A clean tool is a happy tool," rings true! By dedicating a mere hour of your time, you can vastly improve how your equipment performs on DIY projects. Essential Tools and Materials: What You'll Need Gathering the right tools is the first step to a successful cleaning operation. This endeavor requires minimal investment. For cleaning, you'll usually need a brass bristle brush, a nylon brush, a putty knife, and a shallow plastic container for soaking your blades. Essential materials include clean shop rags, dish soap, lubricating oil, paper towels, and a reliable cleaner such as Simple Green. Step-By-Step Guide to Clean Like a Pro The cleaning process can be broken down into seven key steps: Disassemble the Router Bits: Safely remove any movable parts from your router bits. Prepare the Cleaning Solution: Create a gentle but effective solution using Simple Green or dish soap mixed with water. Submerge and Soak: Let your saw blades and router bits soak for approximately 15 minutes. Remove Buildup: Scrub gently using brushes to remove dirt and pitch. Rinse and Dry Well: Thoroughly rinse under water and dry with towels or a hair dryer. Lubricate: Apply oil to the moving parts during reassembly to enhance longevity. This comprehensive approach not only preserves your tools but also ensures optimal functionality on your next DIY project. Exploring Alternative Cleaning Methods For those looking for alternative cleaning options, many industry professionals recommend products such as Boeshield Blade and Bit Cleaner or Rockler’s Pitch and Resin Remover. These specialized solutions can drastically reduce the time spent on this task, as they’re designed to break down tough pitch and resin quickly. Using readily available products such as Nature’s Orange D-Limonene can also do the trick. However, always ensure that the cleaning method chosen won't harm the equipment or leave any residues. A Common Misconception: When to Replace? It’s often presumed that dull blades must be replaced. This misconception can lead to needless spending. Before dumping a so-called dull blade, consider the amount of pitch or grime it might be caked in. Regular maintenance can yield impressive results, transforming a blade you deemed useless back into a tool ready for any project. Many woodworkers swear by this approach, indicating that a little maintenance far outweighs the cost of replacement. The Benefits of Cleaning Your Tools Investing time and effort into cleaning your tools has two main benefits. First, it leads to enhanced performance during cutting tasks, making them quicker and more efficient. Secondly, it extends the lifespan of your blades and bits, saving you money over time. As noted by fellow hobbyists, maintaining a habit of cleaning ensures that you're always prepared for your next creative endeavor. Final Thoughts: DIY with Confidence Now that you’ve learned effective cleaning techniques for your saw blades and router bits, you’re one step closer to being a DIY master! Engaging with your tools and making a habit of cleaning will not only elevate your home projects but also prolong the life of your equipment. Don’t neglect these valuable tips; however, remember to revisit the cleaning process regularly to maintain performance and longevity. With diligence, you'll find cleaning blades just as satisfying as the art of DIY itself!

04.08.2026

Unlocking Your DIY Potential: Master Tile Cutting Tools with Ease

Update Mastering the Essential Tile Cutting Tools for DIYers When it comes to undertaking a tile project, having the right tools at your disposal can make all the difference between a tedious task and a gratifying experience. No matter if you're updating your bathroom tiles or creating a stunning kitchen backsplash, understanding how to correctly cut tiles is vital for a professional finish. This article breaks down the best methods of tile cutting, featuring three popular tools: manual snap cutters, angle grinders with diamond blades, and wet tile saws. Choosing the Right Tool for the Job Before rolling up your sleeves, the first step in your tile cutting journey is to assess the type of tile you're working with and the kind of cuts needed. Each tile cutting tool serves a different purpose: Manual Snap Cutter: Ideal for straight cuts, particularly in ceramic and porcelain tiles up to 1/2 inches thick. Angle Grinder with a Diamond Blade: Perfect for intricate cuts, including curves and unique shapes like around plumbing fixtures. Wet Tile Saw: Best for larger projects, as it enables precise, clean cuts on various materials, including glass and porcelain. Understanding these tools not only boosts your confidence but also equips you to make the right choice for each phase of your project. How to Cut Tile with a Manual Snap Cutter The manual snap cutter reigns supreme for straight cuts, making it user-friendly, especially for newcomers. Simply follow these steps: Measure and Mark: Use a square to determine your tile size and make a clear mark. Position the Tile: Align your tile against the cutter’s fence, ensuring the scoring wheel is on the marked line. Score the Tile: Pull the cutter’s lever while applying moderate pressure to create a visible score. Snap the Tile: Position the breaker foot slightly below the tile's top and apply downward pressure. Smooth Edges: Use a rubbing stone to finish your piece, ensuring no jagged edges remain. By mastering this straightforward method, you'll be prepared for many basic tiling projects ahead. Utilizing an Angle Grinder for More Complex Cuts If your tiling project calls for more than just straight lines, it’s time to introduce the angle grinder into your toolkit. Here’s how: Setup: Ensure you have a diamond blade made for tile and protective gear, including safety glasses and a respirator. Mark Your Cuts: Use a spray bottle of water to keep dust down and mark your cutting line accordingly. Clamp the Tile: Secure the tile onto a piece of plywood to prevent slipping. Make Your Cuts: Steadily follow your marked line without rushing, ensuring cleaner edges and minimal chipping. The angle grinder offers versatility that can adapt to various cutting needs, facilitating customization that’s essential for unique installation environments. Techniques for Using a Wet Tile Saw The wet tile saw is favored for bulk cuts and ensures clean, precise slices. Here’s how to use it effectively: Mark Your Cuts: Indicate the cutting line clearly on your tile. Prep the Saw: Ensure the reservoir has enough water and check that the blade is sharp. Guiding the Tile: Slowly feed the tile into the saw, allowing the tool to do the work without forcing through the material. Smoothing Edges: Just like with the manual cutter, finish off with a rubbing stone for clean edges. Wet saws are excellent for larger projects, allowing for not just precision but also a speed that manual methods lack. Final Considerations for DIY Tilers Regardless of which tool you choose, safety should always be your top priority. Always wear protective gear and take precautions to avoid injury. Furthermore, familiarizing yourself with each tool's capabilities will enable smoother workflow, minimize frustrations, and lead to beautiful tile installations. Equipped with these tips and techniques, you’re now ready to approach tile cutting with confidence. Don't be intimidated; with practice and the right tools, you'll master the art of tiling in no time. So, gather your materials, and let’s get started on your next DIY project!

Terms of Service

Privacy Policy

Core Modal Title

Sorry, no results found

You Might Find These Articles Interesting

T
Please Check Your Email
We Will Be Following Up Shortly
*
*
*