Add Row
Add Element
UPDATE
Add Element
  • Home
  • Categories
    • Cleaning & Moving
    • Maintenance / Repairs
    • Remodeling & Construction
    • Landscaping / Outdoor
    • Security & Technology
    • Sustainability, Health & Safety
    • Interiors / Décor
    • Expert Interviews
    • DIY Home Projects
Home Wise News!
Wise Insights, Reliable Contractor Advice & Hands on DIY Know How for Savvy Homeowners
October 17.2025
3 Minutes Read

Transform Your Entryway: Build the Hall Tree of Your Dreams

DIY hall tree entryway diagram with measurements and labels

Transform Your Entryway: Build the Hall Tree of Your Dreams

Entryways are the first impression your home makes, and a sophisticated hall tree can offer both style and functionality. In this guide, we’ll delve into constructing the elegant entryway hall tree you’ve always wanted.

Understanding the Hall Tree Concept

The concept of a hall tree goes beyond mere aesthetics; it’s about creating a space where functionality meets design. Hall trees typically feature a bench for sitting, storage options for shoes and outerwear, and hooks for accessories. They serve as the transitional space between the outside and inside of your home, allowing for organization and style.

The Benefits of a Functional Entryway

A well-designed hall tree not only provides a place to hang coats and store shoes but also reduces clutter and enhances your home’s visual appeal. With endless customization options—from color and material choices to additional features like drawers or cubbies—each homeowner can tailor the design to perfectly fit their lifestyle.

Your Blueprint to Building a Modern Hall Tree

Constructing your own hall tree is not just rewarding but offers the chance to create a piece that seamlessly fits your entryway. With some essential tools and materials—like plywood, a drill, and a saw—you can transform your vision into reality. A good estimate for material costs hovers around $200, making this a budget-friendly option compared to store-bought alternatives.

Essential Tools and Materials You'll Need

Before you start your DIY project, gather the following tools:

  • Circular Saw
  • Drill/Driver
  • Belt Sander
  • Pocket Hole Jig
  • Brad Nailer

These are vital in ensuring precision and ease during construction. You will also need materials such as high-quality plywood and solid wood for durability and aesthetic appeal.

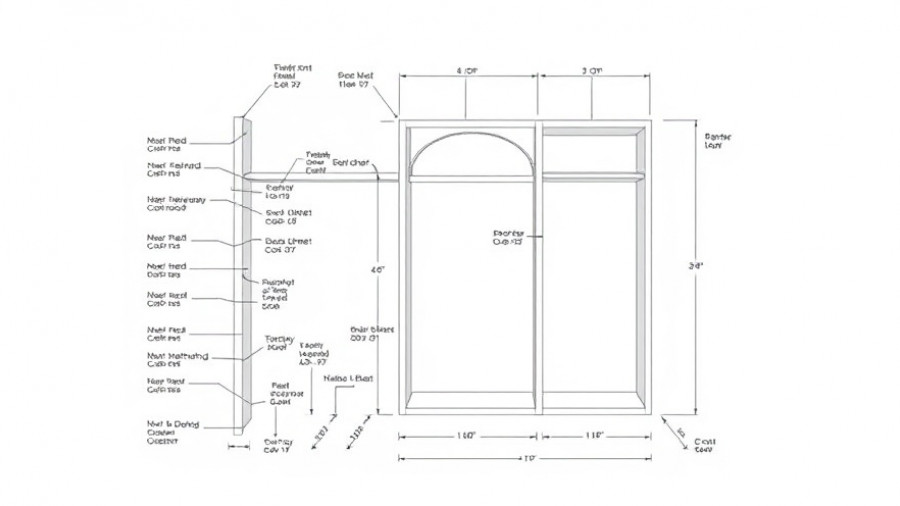
Step-by-Step Instructions to Get You Going

The process begins with planning and measuring your space accurately. The step-by-step building guide includes making cuts for plywood, assembling the frame accurately, adding a back panel for stability, and incorporating shelves or hooks to maximize function.

For example, creating customizable compartments for shoes or bags can help maintain an organized space. Using a wipe-on polyurethane finish enhances the wood's natural beauty while providing protection.

Design Tips for Personalization

Embrace creativity in your hall tree design. Depending on your aesthetic—be it modern, rustic, or farmhouse style—alter the trim, colors, and even the layout. Adding crown molding or decorative hooks can elevate your hall tree from functional to fabulous.

Moreover, consider creating space for more significant items like umbrellas or winter gear. Think about integrating interchangeable decor to modify the look seasonally.

Conclusion: Get Building!

Now that you have the inspiration and a basic guide to building your entryway hall tree, it’s time to gather your tools and materials and get started. There's no better way to enhance your home's first impression than with a beautifully crafted hall tree that reflects your personal style.

Start your DIY journey today and take the first steps toward transforming your entryway into a functional and stylish space. Happy building!

DIY Home Projects

Write A Comment

*
*
Related Posts All Posts
10.18.2025

Freshen Your Carpets Naturally: Learn How Baking Soda and Peroxide Work Wonders

Update Unlock the Power of Baking Soda and Peroxide for Spotless Carpets Carpet cleaning doesn’t have to involve a barrage of harsh chemicals or cumbersome equipment. With simple household items like baking soda and hydrogen peroxide, you can restore the freshness of your carpets in no time! This dynamic duo offers an eco-friendly solution to even the toughest stains without compromising your family’s health. How Do Baking Soda and Peroxide Work Together? Baking soda is a natural deodorizer and stain remover that works by absorbing moisture and oils. Hydrogen peroxide, on the other hand, is an effective oxidizer that breaks down the color bonds in stains. When you combine these two ingredients, it creates a gentle yet potent cleaning solution that can tackle mud, spills, and even pet accidents without the risk of fading or harm. Preparation: What You'll Need To kick off your carpet cleaning adventure, you’ll need: 1 cup of 3% hydrogen peroxide 2 tablespoons of baking soda 2 cups of water A spray bottle Rags or a soft brush A vacuum cleaner Make sure you’re using 3% hydrogen peroxide, as higher concentrations might damage your carpet fibers. A Foolproof Cleaning Method for Carpets Ready to dive in? Here’s a step-by-step guide to clean your carpets using baking soda and hydrogen peroxide: Vacuum First: Remove any loose debris from the carpet. Test a Spot: Before applying your solution, test it in a small, inconspicuous area of your carpet. Wait for ten minutes to check for any color fading or damage. Mix the Solution: In a spray bottle, combine the baking soda, hydrogen peroxide, and water. Shake gently to mix. Apply It: Lightly mist the area with your cleaning solution until it’s damp, not soaked. Let It Sit: Allow the mixture to work its magic for five to ten minutes. Blot the Stain: Using a clean, white rag, dab the stained area without rubbing to avoid damaging the fibers. Finishing Touch: Once dry, vacuum to remove any residual baking soda. Repeat if necessary or adjust the solution by incorporating a drop of dish soap to tackle stubborn stains. When to Use This Method While baking soda alone is safe for monthly deodorizing, hydrogen peroxide should be used sparingly. This combination is ideal for localized stains and odors, allowing your cleansers to work efficiently without causing damage to your carpet fibers over time. Keeping Your Carpets Fresh: Maintenance Tips To prolong the life of your carpets and keep them looking sharp, maintain a regular cleaning routine: Frequent Vacuuming: This helps avoid dirt settlement in the fibers and reduces wear. Rugs and Doormats: Placing rugs can trap dirt, and using doormats prevents tracked-in grime. Immediate Response: Address spills right away. The quicker you act, the easier the stain will be to remove. What If Stains Persist? Don't panic! Sometimes, stains will lighten with repeated treatments. If they're particularly stubborn, a professional cleaning might remain your best option. Pros have advanced tools and solutions that can tackle stains and odors effectively. Final Thoughts and Call to Action Next time you face stubborn stains on your carpet, consider reaching for your pantry staples—baking soda and hydrogen peroxide instead of toxic cleaners. Your carpets will thank you while also keeping your atmosphere cleaner and safer for your family. Embrace this natural method and bring back the sparkle to your home!

10.18.2025

Essential Steps for Winterizing Your Hot Tub Before Freeze Sets In

Update Understanding the Importance of Winterizing Your Hot Tub When the cold months roll in, thoughts of relaxing in your hot tub may begin to fade if you plan to close it up for the season. Winterizing your hot tub is crucial if you're not planning to use it regularly. Failure to properly prepare it for winter can lead to serious issues, including frozen water lines and costly damages to the internal mechanisms. Consequences of Neglecting to Winterize Your Hot Tub Neglecting the winterizing process can lead to many problems. For instance, standing water in the hot tub can freeze, causing pipes and pumps to crack, resulting in expensive repairs. Moreover, stagnant water is a breeding ground for algae and bacteria, leading to smelly, cloudy water that can take hours to clean in the spring. Hot tub expert Levi Freedman reminds homeowners that components such as the heating element are particularly susceptible to ice-related damage. It's essential to address these factors now rather than deal with the ramifications later. Step-by-Step Guide to Winterizing Your Hot Tub Winterizing your hot tub might seem daunting, but breaking it down into actionable steps makes the process manageable. Turn Off the Power: Ensure you cut the power supply at the breaker before beginning the process to prevent any electrical hazards. Remove Debris: Use a net or scooper to eliminate large items like leaves and branches from the tub. Drain the Water: Open the drain valve and allow all the water to flow out. You can also use a sump pump to expedite the process if necessary. Clear Out the Jets: Utilize a wet/dry vacuum to remove any remaining water from the jets and plumbing lines. Uhle emphasizes that even small amounts of water can freeze and lead to cracks. Disconnect Components: Detach the pumps and heaters to help eliminate any trapped water. It’s crucial to ensure that all parts are dry to prevent any mishaps. Clean Filters: Remove, clean, and dry the hot tub filters before storing them indoors. Antifreeze Application: Pour non-toxic RV antifreeze into the plumbing lines for added protection against freezing, using a funnel for precision. Secure the Cover: Ensure the hot tub cover fits snugly to block out debris and maintain the internal integrity. Consider placing a tarp over it for further protection, especially in regions with heavy snowfall. Remember to check the manufacturer’s guidelines for model-specific instructions, and if overwhelmed, don’t hesitate to hire a professional. Best Practices and Maintenance Tips Winterizing your hot tub is not only about protecting it from winter weather but also about implementing effective maintenance strategies. During those months when the tub is not in use, it’s best to check on it every few weeks to prevent build-up of condensation, which can lead to mold. A simple tip is to open the cover slightly to ventilate, ensuring the inside remains dry. Furthermore, maintain an eye on any wear and tear that might occur, by inspecting your hot tub cover and components once the winter is over, preparing you for immediate maintenance in the spring so you can enjoy your hot tub hassle-free. Conclusion: Proactive Maintenance for Enjoyment Year-Round Taking the time to winterize your hot tub properly saves you from potential headaches and substantial repair costs, opening up the world of enjoyment come spring. Every homeowner can tackle this task with the correct knowledge and approach. Remember, this proactive measure can lead to enjoyable experiences whenever you choose to bask in your hot tub once winter is over. To further enhance your home maintenance skills, explore more DIY projects that empower you to take control of your home’s upkeep.

10.18.2025

Discover the DIY Pool Noodle Technique for Damage-Free Holiday Decor

Update The Clever Use of Pool Noodles in Holiday Decorating As the holiday season approaches, homeowners are often on the lookout for unique and festive ways to decorate their spaces without causing damage or incurring significant costs. One innovative approach gaining popularity comes from TikTok user @craftybudgetqueen, who has showcased a brilliant method involving pool noodles. This affordable technique not only adds a vibrant touch to your mantelpiece but also ensures that your decorations can be easily removed post-holidays without leaving any unsightly marks or holes. Transforming Your Mantle: The Pool Noodle Technique Creating a stunning holiday display doesn’t have to be complicated. The process begins with a simple pool noodle. Crafty Budget Queen’s method involves cutting the noodle lengthwise and securing it to the edge of the fireplace mantel. After making vertical cuts in the noodle—these act as slots for securing decorative elements—she embellishes it with faux evergreen garland, which she artfully drapes for visual appeal. To conceal the noodle itself, she inserts faux poinsettias and holly berries among the garland for added color and dimension. Lastly, flutes filled with water hold tea lights, creating a warm and enchanting setting when illuminated. Why Pool Noodles Are Winning Hearts This Season Using pool noodles for holiday décor is not just a trend; it offers tangible benefits: Cost-Effective: Pool noodles are inexpensive and readily available at craft or dollar stores, making them an ideal material for homeowners on a budget. Easy to Handle: The lightweight nature of pool noodles allows for easy cutting and shaping, ensuring that anyone—regardless of crafting experience—can create beautiful decorations. Damage-Free: Unlike traditional mounting setups, pool noodles won't leave residue or holes on surfaces, making them perfect for temporary decorations. Other Festive Uses for Pool Noodles While the mantle garland is fantastic, pool noodles can be adapted for various festive decorations. Inspired by ideas from sources like Family Handyman and several DIY bloggers, here are just a few creative concepts: Giant Candy Canes: Pool noodles can easily be shaped into oversized candy canes, tied with festive ribbon, standing proudly in your yard or as part of your door decor. Christmas Trees: Transforming pool noodles into festive trees involves cutting them to varying lengths and shaping them into a cone, adorned with lights for brightness. Holiday Wreaths: Two pool noodles can be shaped into a circular wreath and decorated with ornaments or garland—perfect for adorning your front door. Embrace the DIY Spirit: Explore Your Crafty Side Engaging in DIY projects can be therapeutic and rewarding. Homeowners and crafters have found immense joy in creating their own decorations, particularly during the holidays. Not only does it save money, but it also brings a sense of ownership and personalization to seasonal decorations that store-bought items lack. Plus, gathering family or friends for a crafting session can spark creativity and create lasting memories. Future Decoration Trends: Simplicity with Purpose As we look to the future of home decorating, the trend of using multipurpose materials—like pool noodles—will likely continue. Homeowners are increasingly valuing simplicity and aesthetics, balancing fun and festive spirit while maintaining practicality in their home maintenance and repairs. This trend also reflects in the broader DIY movement, encouraging individuals to take control over their home aesthetics while being mindful of budget and space. Whether you’re an experienced DIY enthusiast or a curious beginner, experimenting with household items like pool noodles can yield gratifying results. Given the simplicity and creativity encouraged by pool noodles, this holiday season could be a wonderful opportunity to add a touch of personalized charm to your home decor. So, gather your supplies and let the festivities begin!

Terms of Service

Privacy Policy

Core Modal Title

Sorry, no results found

You Might Find These Articles Interesting

T
Please Check Your Email
We Will Be Following Up Shortly
*
*
*