Add Row
Add Element
UPDATE
Add Element
  • Home
  • Categories
    • Cleaning & Moving
    • Maintenance / Repairs
    • Remodeling & Construction
    • Landscaping / Outdoor
    • Security & Technology
    • Sustainability, Health & Safety
    • Interiors / Décor
    • Expert Interviews
    • DIY Home Projects
Home Wise News!
Wise Insights, Reliable Contractor Advice & Hands on DIY Know How for Savvy Homeowners
July 05.2025
3 Minutes Read

Transform Your Kitchen with This Comprehensive Deep Cleaning Guide

Deep cleaning a modern kitchen in a large Mississauga home.

Embracing the Big Clean: Why Your Kitchen Needs It

Living in large Mississauga homes comes with its perks, including spacious kitchens that serve as the heart of family life. However, these expansive kitchens require extra attention to maintain cleanliness and hygiene. More cabinets, appliances, and foot traffic mean more spots for dirt, grease, and crumbs to accumulate. A recent study from Statistics Canada revealed that homes in Canada are getting larger, which translates to bigger messes in kitchens. Understanding the need for deep cleaning in your kitchen not only helps maintain its aesthetic appeal but also promotes a healthier environment for your family.

Step-by-Step Guide to Deep Cleaning Your Large Kitchen

With a plan in place, deep cleaning your kitchen can be less daunting. Here’s how to tackle every inch of your space systematically:

Step 1: Preparing Your Kitchen

Before you dive into cleaning, start by decluttering. Remove everything from the counters, cabinets, and drawers. Place items temporarily on your dining table or in boxes. This will not only make it easier to clean but will also give you an opportunity to check expiration dates on food items and donate any unused kitchenware. Gather your cleaning supplies, including:

  • All-purpose cleaner
  • Degreaser
  • Glass cleaner
  • Disinfectant wipes
  • Microfiber cloths
  • Scrub brushes
  • Vacuum cleaner
  • Mop and bucket

Step 2: Cabinets and Pantry First!

Start cleaning from the top cabinets, working your way down. Remove everything inside and wipe down the interiors, paying special attention to corners where crumbs tend to accumulate. Don’t forget to clean the cabinet doors and handles, which often harbor germs. In the pantry, be sure to check the expiration dates and wipe down the shelves. Consider rearranging your items by category, using clear containers for dry goods to prolong freshness.

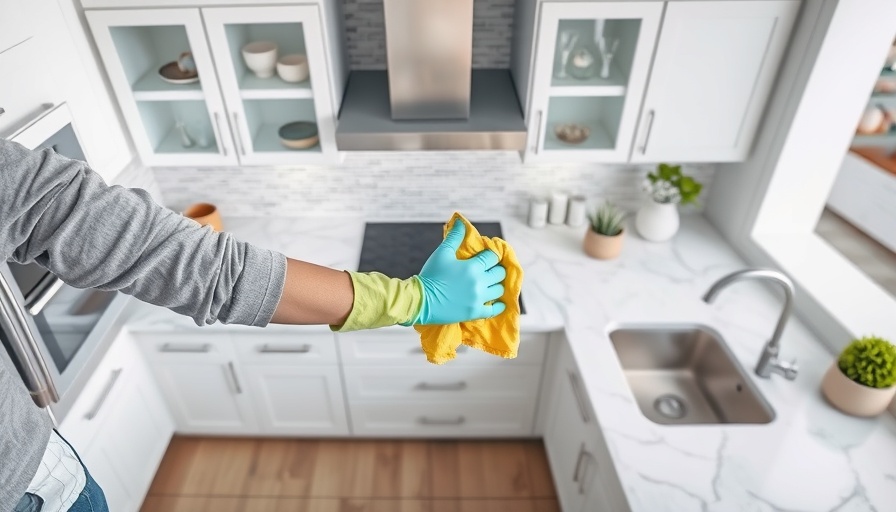
Step 3: Focus on Countertops and Backsplash

Once the cabinets and pantry are clean, move onto the countertops and backsplash. This step is essential as these surfaces are often overlooked yet bear the brunt of cooking spills and stains. Use the appropriate cleaners for specific materials (e.g., granite, laminate) and ensure they are thoroughly dried afterward.

Embracing Sustainable Cleaning Practices

By adopting sustainable cleaning practices, you not only contribute positively to the environment but also ensure your home remains a safe space. Use eco-friendly cleaning products or DIY solutions such as vinegar and baking soda. These methods are not only efficient but also safe for your family and pets, reducing the risk of allergens and harsh chemicals.

The Value of Regular Maintenance

Deep cleaning your kitchen shouldn’t be an annual chore; instead, consider incorporating regular maintenance throughout the year. Establish a cleaning schedule, focusing on specific areas each week. A well-maintained kitchen will greatly enhance your quality of life by ensuring that your space is always fresh and inviting for cooking or entertaining guests.

Conclusion: Take the Leap!

Deep cleaning your kitchen may seem daunting, especially in large homes, but breaking it down into manageable steps makes the process easier and more productive. Not only will you enjoy a cleaner space, but you’ll also foster a healthier environment for your family. Are you ready to transform your kitchen?

Whether you're enjoying a bustling family life or frequenting guests, keeping your kitchen clean is a wonderful way to show you care about your home. So roll up your sleeves, gather your supplies, and let’s get started!

Cleaning & Moving

Write A Comment

*
*
Related Posts All Posts
08.20.2025

Simplifying Your Move: Essential Tips for Busy Professionals

Update Streamlining Your Move: Tips for Busy Professionals For busy professionals, moving can feel overwhelming due to conflicting schedules and tight deadlines. However, with the right strategies, it can be a manageable process. Utilizing the services of a local moving company in Austin can transform this daunting task into a seamless transition. Why Hire Professional Movers? Hiring a trusted moving company alleviates the burden of logistics. Professionals understand the intricacies of local moves, ensuring that every detail is handled with care. Their expertise not only helps in packing and transporting items but also minimizes stress, allowing you to focus on your career. Preparation is Key: Create a Moving Checklist Planning your move well ahead of time is crucial. Develop a checklist that outlines tasks week by week leading up to the moving day. Begin with sorting and packing non-essential items. This advance preparation can save you significant time and reduce last-minute chaos. Declutter to Lighten the Load Before packing, take the time to evaluate what you truly need. Consider donating or discarding items that no longer serve a purpose. A lighter load not only makes the move easier but also cuts down costs associated with transportation. Labeling: An Easy Unpacking Solution Efficient labeling can relieve confusion during unpacking. Clearly mark each box with its contents and the designated room in your new space. This simple step ensures that movers know exactly where to place items, speeding up the transition to your new home. Essential Moving Supplies Invest in high-quality packing materials including sturdy boxes, bubble wrap, and strong packing tape. Protecting your belongings with the right supplies can save you from damages during transport, especially for fragile items. Don’t Forget the Essentials Bag As moving day approaches, prepare a bag containing items you'll need immediately after the move. Include chargers, personal documents, clothing, and toiletries. This will spare you the trouble of searching through multiple boxes for necessities. Communicate and Confirm Maintain open communication with your moving company. Confirm details a few days before the move to prevent any confusion or misunderstandings. Regular contact will ensure a smooth moving experience. By embracing professional help and incorporating these organization strategies, relocating can transition from a stressful ordeal into a simple part of your busy life. Focus on what matters: your career, family, and enjoying your new home!

08.20.2025

Mastering the Art of Cleaning Laminate Countertops: Pro Tips Inside!

Update Keeping Your Laminate Countertops Spotless: The Basics Laminated countertops are a staple of modern kitchens, combining style and affordability. Their low-maintenance appeal, however, can lead to misconceptions about cleaning. If you think a simple wipe with a wet cloth will do, think again! While laminate is durable and resistant to many stains, it still requires some special care. The No-Go Zones: Understanding What Not to Use First off, let's talk about cleaning products that can do more harm than good. Avoid anything abrasive, like scouring pads or powder cleansers—they can scratch and dull the surface over time. Similarly, products containing bleach or ammonia can warp or discolor the laminate. Stick with a mild detergent to keep your countertops looking new! A Homemade Solution: Simple Yet Effective Why not go the natural route? A mixture of warm water and a few drops of dish soap creates a gentle cleaner. For tougher stains, white vinegar diluted with water works wonders. Just spray, let it sit for a few minutes, then wipe it away. Not only is this green option effective, but it’s also easy on the wallet! Embracing Technology: Smart Cleaning Gadgets As a tech enthusiast, I can’t resist mentioning the new wave of cleaning gadgets hitting the market. Devices like robotic cleaners can tackle hard surfaces with ease. However, they might require a little extra care and guidelines. Check for compatibility—some may not be suitable for laminate surfaces, so read the fine print! The Art of Drying: Finishing Touches Matter After cleaning, drying your laminate is critical. Never let it air dry. Instead, use a soft cloth to prevent water spots and streaks. Think of it as polishing your masterpiece before unveiling it to the world—nothing says style like a spotless countertop! Keeping It Clean: Regular Maintenance Tips Now that your countertops are gleaming, let’s keep them that way. Make it a habit to wipe down your surfaces daily. A simple routine can prevent grime buildup and protect against stains. Remember, prevention is better than cure! Preparing for Future Remodeling? Upgrade Your Surfaces If you're considering a kitchen remodel, laminate is often viewed as a budget-friendly option. However, advancements in technology now offer alternatives, such as quartz or recycled materials, which may better suit your aesthetic. Keep an eye out for these innovative options that blend form and function! Your Involvement Counts: Join the Conversation! As a busy homeowner, balancing style and practicality is essential when caring for your kitchen. What are your go-to cleaning methods? Share your tips and tricks in our comments section! After all, cleaning laminate countertops doesn’t have to feel like a chore. With the right approach, you can keep them dazzling!

08.20.2025

Transform Your Couch: Effective Methods to Remove Gum Easily

Update Say Goodbye to Stubborn Gum: A Comprehensive GuideFinding gum stuck on your beloved couch can feel like a mini-disaster. Whether it’s the result of playful children, curious pets, or a spontaneous moment, you don’t have to let this sticky situation ruin your day. Armed with a few household items and patience, you can restore your couch to its former glory without damaging its fabric. Here’s how to effectively remove gum from your couch cushions while keeping your home clean and inviting.Understanding the Problem: Why Gum Gets StuckGum, while a favorite treat for kids, can be an enemy to upholstery. It sticks and clings, creating an unsightly mess that can feel impossible to tackle. Understanding how gum adheres to fabric can help in selecting the right removal method. When gum is fresh, it remains pliable, but as it hardens, it can penetrate deeper into the fabric fibers. Handling it swiftly is key to preventing any longer-term damage to your couch.Method #1: The Ice Technique - Perfect for Fresh GumIf you find fresh gum, the ice method is your best friend. This technique takes advantage of cold temperatures, which cause the gum to harden, making it easier to scrape off. Here’s how to do it:Place ice cubes in a plastic bag to prevent moisture damage.Press the bag against the gum for about 10–15 minutes.Use a butter knife or a plastic scraper to gently lift the gum from the edges towards the center.Remove any remaining bits with your fingers, and clean the area with a damp cloth.This method is not only effective but also simple and quick, promoting easy home maintenance.Method #2: The Heat Approach - Tackle Stubborn StainsFor those older gum stains that just won’t budge, heat is your go-to solution. This method involves softening the gum with a hairdryer, allowing it to lift away from the fabric more effortlessly. Here's how:Set your hairdryer to medium heat and direct the warm air onto the gum for about 1-2 minutes.Once soft, press a clean cloth against the gum to lift it.Continue until all gum is removed and clean the area with warm soapy water.Timing is everything; work quickly to transfer the gum from your couch to the cloth, ensuring a successful gum removal.Method #3: Natural Solutions - Vinegar and CitrusIf you prefer eco-friendly options, vinegar and citrus are excellent alternatives that can effectively break down the gum’s sticky properties. These methods are safe for most fabrics and provide a natural clean. Here’s a simple approach:Dab vinegar or citrus oil directly onto the gum and let it sit for a few minutes.Gently scrape the gum with a cloth or scraper and remove the residue.Preventing Future Incidents: Maintenance Tips for HomeownersWhile knowing how to remove gum is invaluable, preventing future sticky situations is just as important. Here are some preventive tips:Use couch covers to protect fabric from potential stains.Keep chewing gum and similar products out of reach of kids and pets.Regularly clean and inspect your couch to maintain its condition.By integrating these simple tips, you can minimize the likelihood of gum mishaps, allowing you to focus on enjoying your living space.When to Seek Professional HelpSometimes, despite our best efforts, tough gum stains may require professional care. If you find that gum has deeply penetrated your upholstery, consider hiring a cleaning service. For instance, trusted services like Hellamaid specialize in comprehensive home cleaning and can help rejuvenate your furniture while you sit back and relax.Empowering Your Cleaning JourneyRemoving gum from couch cushions doesn’t have to be a dreaded chore. Equipped with the right techniques, you can tackle this pesky problem and maintain a clean, inviting home environment.Take the Next StepReady to take action? Whether you’re using ice, heat, or natural solutions, these methods can empower you to keep your home looking its best. With a little determination and these DIY strategies, your sofa can shine bright, gum-free!

Terms of Service

Privacy Policy

Core Modal Title

Sorry, no results found

You Might Find These Articles Interesting

T
Please Check Your Email
We Will Be Following Up Shortly
*
*
*