Add Row
Add Element
UPDATE
Add Element
  • Home
  • Categories
    • Cleaning & Moving
    • Maintenance / Repairs
    • Remodeling & Construction
    • Landscaping / Outdoor
    • Security & Technology
    • Sustainability, Health & Safety
    • Interiors / Décor
    • Expert Interviews
    • DIY Home Projects
Home Wise News!
Wise Insights, Reliable Contractor Advice & Hands on DIY Know How for Savvy Homeowners
September 02.2025
3 Minutes Read

Transform Your Porch with Fall and Winter Decor Ideas: Expert Tips

Charming fall winter porch decor ideas with wreath and pumpkins.

Embrace Seasonal Transitions with Timeless Porch Ideas

As the crisp air of fall gives way to winter's chill, homeowners face the dilemma of constantly updating their outdoor decor. However, with thoughtfulness in design and color choice, you can create a charming porch aesthetic that transitions seamlessly across the seasons. Below are six expert-backed ideas for decorating your porch, allowing you to enjoy an inviting space without the continuous effort of redecorating.

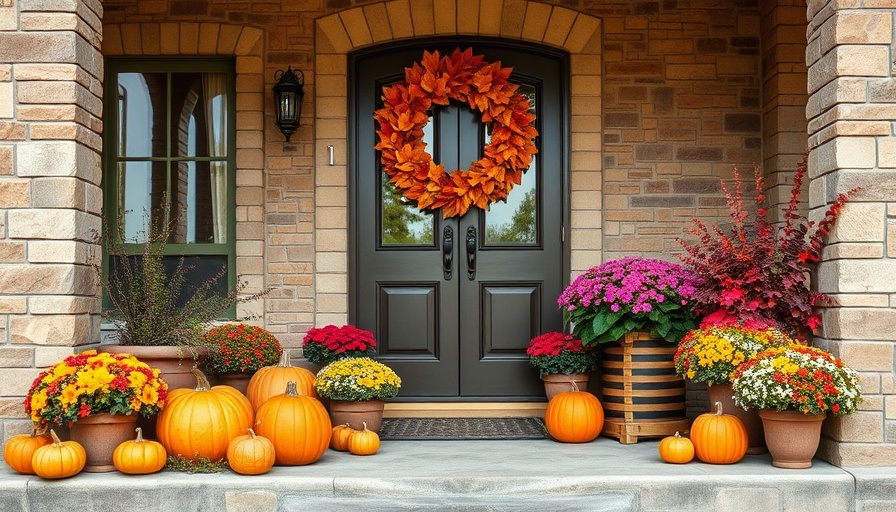
A Classic Wreath: A Seasonal Staple

No porch is complete without a stunning door wreath, which can be a beautiful representation of the changing seasons. Designer Tom Yates advises starting with a natural-looking base made from branches and greenery. This allows for easy customization; for fall, accent with rustic elements, while for winter, switch to deeper, richer colors like burgundy or forest green. This adaptability not only enhances the visual appeal but also enriches your home's exterior across various holidays.

Neutral Color Palettes: The Versatile Choice

When setting your porch decor, consider adopting a neutral color palette that can span both fall and winter. Brandon McCormick, a landscape designer, suggests earthy tones mixed with deep greens for an elegant look. By incorporating accents in warm bronze or copper for autumn, and transitioning to sleek blacks and creams for winter, you maintain a cohesive and seasonally appropriate appearance.

Planters that Defy the Seasons

The utility of kale and cabbage planters extends beyond their culinary appeal. These hardy plants provide lively color and texture, surviving through both fall and winter. Interior designer Andrea Sinkin recommends clustering these planters and mixing in seasonal elements as you transition. Pumpkins can accompany colorful cabbages in October, while berries and pine can elevate your winter decor.

Illuminate with Cozy Lighting

Lighting is critical for creating a welcoming ambiance as daylight hours diminish. Oversized lanterns filled with flameless candles or twinkling lights offer both functionality and beauty. Joyce Huston, an interior designer, emphasizes the comfort these lights bring to your porch. Easy to integrate into your existing decor, DIY lanterns can help you avoid high costs while still achieving that perfect cozy glow.

Textured Fabrics Add Warmth

In colder months, adding texture can enhance the warmth of your porch. Think about decorative pillows or soft throw blankets that invite coziness. Layer fabrics in your chosen color scheme for not only comfort but also adding a rich visual in both fall and winter designs. As seasons change, a simple swap of patterns or colors can refresh the look without the need for major changes.

Use Natural Elements to Connect with Nature

Organic materials like wood, stone, and dried flowers make a porch feel inviting. Incorporating organic textures can connect your home to the surroundings regardless of the season. Whether it’s twine-wrapped planters or wooden crates filled with seasonal fruits, natural elements are timeless, and they bring the essence of the outdoors inside your home.

Final Thoughts: Simplifying Seasonal Decor

In summary, designing a porch that transitions smoothly from fall into winter doesn’t have to be an overwhelming task. By incorporating classic elements like wreaths, a neutral color palette, hardy planters, soft textiles, and ambient lighting, you create an inviting space that can be enjoyed all season long. Embrace these tips to ensure your porch remains a beautiful and welcoming sight, no matter the season.

DIY Home Projects

Write A Comment

*
*
Related Posts All Posts
10.18.2025

Freshen Your Carpets Naturally: Learn How Baking Soda and Peroxide Work Wonders

Update Unlock the Power of Baking Soda and Peroxide for Spotless Carpets Carpet cleaning doesn’t have to involve a barrage of harsh chemicals or cumbersome equipment. With simple household items like baking soda and hydrogen peroxide, you can restore the freshness of your carpets in no time! This dynamic duo offers an eco-friendly solution to even the toughest stains without compromising your family’s health. How Do Baking Soda and Peroxide Work Together? Baking soda is a natural deodorizer and stain remover that works by absorbing moisture and oils. Hydrogen peroxide, on the other hand, is an effective oxidizer that breaks down the color bonds in stains. When you combine these two ingredients, it creates a gentle yet potent cleaning solution that can tackle mud, spills, and even pet accidents without the risk of fading or harm. Preparation: What You'll Need To kick off your carpet cleaning adventure, you’ll need: 1 cup of 3% hydrogen peroxide 2 tablespoons of baking soda 2 cups of water A spray bottle Rags or a soft brush A vacuum cleaner Make sure you’re using 3% hydrogen peroxide, as higher concentrations might damage your carpet fibers. A Foolproof Cleaning Method for Carpets Ready to dive in? Here’s a step-by-step guide to clean your carpets using baking soda and hydrogen peroxide: Vacuum First: Remove any loose debris from the carpet. Test a Spot: Before applying your solution, test it in a small, inconspicuous area of your carpet. Wait for ten minutes to check for any color fading or damage. Mix the Solution: In a spray bottle, combine the baking soda, hydrogen peroxide, and water. Shake gently to mix. Apply It: Lightly mist the area with your cleaning solution until it’s damp, not soaked. Let It Sit: Allow the mixture to work its magic for five to ten minutes. Blot the Stain: Using a clean, white rag, dab the stained area without rubbing to avoid damaging the fibers. Finishing Touch: Once dry, vacuum to remove any residual baking soda. Repeat if necessary or adjust the solution by incorporating a drop of dish soap to tackle stubborn stains. When to Use This Method While baking soda alone is safe for monthly deodorizing, hydrogen peroxide should be used sparingly. This combination is ideal for localized stains and odors, allowing your cleansers to work efficiently without causing damage to your carpet fibers over time. Keeping Your Carpets Fresh: Maintenance Tips To prolong the life of your carpets and keep them looking sharp, maintain a regular cleaning routine: Frequent Vacuuming: This helps avoid dirt settlement in the fibers and reduces wear. Rugs and Doormats: Placing rugs can trap dirt, and using doormats prevents tracked-in grime. Immediate Response: Address spills right away. The quicker you act, the easier the stain will be to remove. What If Stains Persist? Don't panic! Sometimes, stains will lighten with repeated treatments. If they're particularly stubborn, a professional cleaning might remain your best option. Pros have advanced tools and solutions that can tackle stains and odors effectively. Final Thoughts and Call to Action Next time you face stubborn stains on your carpet, consider reaching for your pantry staples—baking soda and hydrogen peroxide instead of toxic cleaners. Your carpets will thank you while also keeping your atmosphere cleaner and safer for your family. Embrace this natural method and bring back the sparkle to your home!

10.18.2025

Essential Steps for Winterizing Your Hot Tub Before Freeze Sets In

Update Understanding the Importance of Winterizing Your Hot Tub When the cold months roll in, thoughts of relaxing in your hot tub may begin to fade if you plan to close it up for the season. Winterizing your hot tub is crucial if you're not planning to use it regularly. Failure to properly prepare it for winter can lead to serious issues, including frozen water lines and costly damages to the internal mechanisms. Consequences of Neglecting to Winterize Your Hot Tub Neglecting the winterizing process can lead to many problems. For instance, standing water in the hot tub can freeze, causing pipes and pumps to crack, resulting in expensive repairs. Moreover, stagnant water is a breeding ground for algae and bacteria, leading to smelly, cloudy water that can take hours to clean in the spring. Hot tub expert Levi Freedman reminds homeowners that components such as the heating element are particularly susceptible to ice-related damage. It's essential to address these factors now rather than deal with the ramifications later. Step-by-Step Guide to Winterizing Your Hot Tub Winterizing your hot tub might seem daunting, but breaking it down into actionable steps makes the process manageable. Turn Off the Power: Ensure you cut the power supply at the breaker before beginning the process to prevent any electrical hazards. Remove Debris: Use a net or scooper to eliminate large items like leaves and branches from the tub. Drain the Water: Open the drain valve and allow all the water to flow out. You can also use a sump pump to expedite the process if necessary. Clear Out the Jets: Utilize a wet/dry vacuum to remove any remaining water from the jets and plumbing lines. Uhle emphasizes that even small amounts of water can freeze and lead to cracks. Disconnect Components: Detach the pumps and heaters to help eliminate any trapped water. It’s crucial to ensure that all parts are dry to prevent any mishaps. Clean Filters: Remove, clean, and dry the hot tub filters before storing them indoors. Antifreeze Application: Pour non-toxic RV antifreeze into the plumbing lines for added protection against freezing, using a funnel for precision. Secure the Cover: Ensure the hot tub cover fits snugly to block out debris and maintain the internal integrity. Consider placing a tarp over it for further protection, especially in regions with heavy snowfall. Remember to check the manufacturer’s guidelines for model-specific instructions, and if overwhelmed, don’t hesitate to hire a professional. Best Practices and Maintenance Tips Winterizing your hot tub is not only about protecting it from winter weather but also about implementing effective maintenance strategies. During those months when the tub is not in use, it’s best to check on it every few weeks to prevent build-up of condensation, which can lead to mold. A simple tip is to open the cover slightly to ventilate, ensuring the inside remains dry. Furthermore, maintain an eye on any wear and tear that might occur, by inspecting your hot tub cover and components once the winter is over, preparing you for immediate maintenance in the spring so you can enjoy your hot tub hassle-free. Conclusion: Proactive Maintenance for Enjoyment Year-Round Taking the time to winterize your hot tub properly saves you from potential headaches and substantial repair costs, opening up the world of enjoyment come spring. Every homeowner can tackle this task with the correct knowledge and approach. Remember, this proactive measure can lead to enjoyable experiences whenever you choose to bask in your hot tub once winter is over. To further enhance your home maintenance skills, explore more DIY projects that empower you to take control of your home’s upkeep.

10.18.2025

Discover the DIY Pool Noodle Technique for Damage-Free Holiday Decor

Update The Clever Use of Pool Noodles in Holiday Decorating As the holiday season approaches, homeowners are often on the lookout for unique and festive ways to decorate their spaces without causing damage or incurring significant costs. One innovative approach gaining popularity comes from TikTok user @craftybudgetqueen, who has showcased a brilliant method involving pool noodles. This affordable technique not only adds a vibrant touch to your mantelpiece but also ensures that your decorations can be easily removed post-holidays without leaving any unsightly marks or holes. Transforming Your Mantle: The Pool Noodle Technique Creating a stunning holiday display doesn’t have to be complicated. The process begins with a simple pool noodle. Crafty Budget Queen’s method involves cutting the noodle lengthwise and securing it to the edge of the fireplace mantel. After making vertical cuts in the noodle—these act as slots for securing decorative elements—she embellishes it with faux evergreen garland, which she artfully drapes for visual appeal. To conceal the noodle itself, she inserts faux poinsettias and holly berries among the garland for added color and dimension. Lastly, flutes filled with water hold tea lights, creating a warm and enchanting setting when illuminated. Why Pool Noodles Are Winning Hearts This Season Using pool noodles for holiday décor is not just a trend; it offers tangible benefits: Cost-Effective: Pool noodles are inexpensive and readily available at craft or dollar stores, making them an ideal material for homeowners on a budget. Easy to Handle: The lightweight nature of pool noodles allows for easy cutting and shaping, ensuring that anyone—regardless of crafting experience—can create beautiful decorations. Damage-Free: Unlike traditional mounting setups, pool noodles won't leave residue or holes on surfaces, making them perfect for temporary decorations. Other Festive Uses for Pool Noodles While the mantle garland is fantastic, pool noodles can be adapted for various festive decorations. Inspired by ideas from sources like Family Handyman and several DIY bloggers, here are just a few creative concepts: Giant Candy Canes: Pool noodles can easily be shaped into oversized candy canes, tied with festive ribbon, standing proudly in your yard or as part of your door decor. Christmas Trees: Transforming pool noodles into festive trees involves cutting them to varying lengths and shaping them into a cone, adorned with lights for brightness. Holiday Wreaths: Two pool noodles can be shaped into a circular wreath and decorated with ornaments or garland—perfect for adorning your front door. Embrace the DIY Spirit: Explore Your Crafty Side Engaging in DIY projects can be therapeutic and rewarding. Homeowners and crafters have found immense joy in creating their own decorations, particularly during the holidays. Not only does it save money, but it also brings a sense of ownership and personalization to seasonal decorations that store-bought items lack. Plus, gathering family or friends for a crafting session can spark creativity and create lasting memories. Future Decoration Trends: Simplicity with Purpose As we look to the future of home decorating, the trend of using multipurpose materials—like pool noodles—will likely continue. Homeowners are increasingly valuing simplicity and aesthetics, balancing fun and festive spirit while maintaining practicality in their home maintenance and repairs. This trend also reflects in the broader DIY movement, encouraging individuals to take control over their home aesthetics while being mindful of budget and space. Whether you’re an experienced DIY enthusiast or a curious beginner, experimenting with household items like pool noodles can yield gratifying results. Given the simplicity and creativity encouraged by pool noodles, this holiday season could be a wonderful opportunity to add a touch of personalized charm to your home decor. So, gather your supplies and let the festivities begin!

Terms of Service

Privacy Policy

Core Modal Title

Sorry, no results found

You Might Find These Articles Interesting

T
Please Check Your Email
We Will Be Following Up Shortly
*
*
*