Add Row
Add Element
UPDATE
Add Element
  • Home
  • Categories
    • Cleaning & Moving
    • Maintenance / Repairs
    • Remodeling & Construction
    • Landscaping / Outdoor
    • Security & Technology
    • Sustainability, Health & Safety
    • Interiors / Décor
    • Expert Interviews
    • DIY Home Projects
Home Wise News!
Wise Insights, Reliable Contractor Advice & Hands on DIY Know How for Savvy Homeowners
May 07.2025
3 Minutes Read

Uncover the Power of a Fold-Up Grill Table for Effortless Outdoor Cooking

DIY grill table with food in garden setting, twilight lighting.

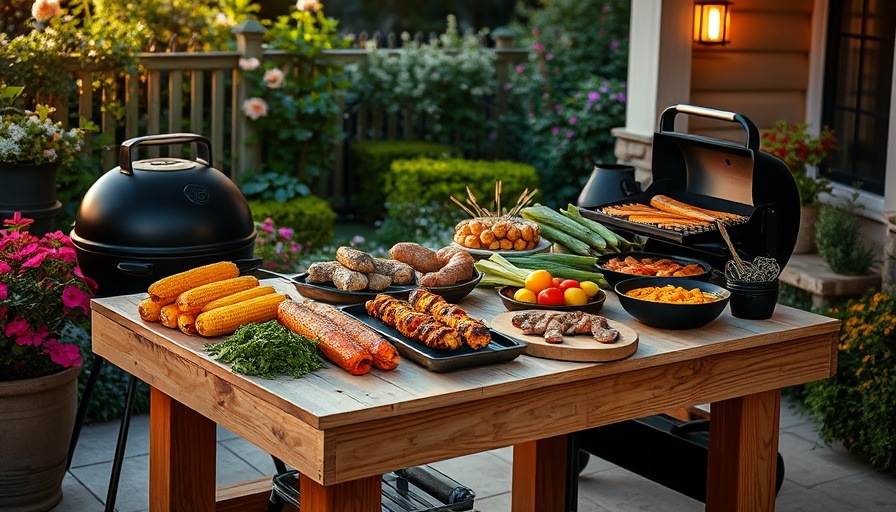
Transform Your Outdoor Cooking Experience with a Fold-Up Grill Table

Whether it’s a weekend gathering or a casual barbecue on a weeknight, the right setup can make all the difference in your outdoor cooking experience. One essential piece to enhance this experience is a fold-up grill table, adding convenience and functionality to your setup.

Why You Need a Fold-Up Grill Table

Grill tables serve as a critical workspace, especially when you're juggling multiple tasks from grilling to assembling sides. A fold-up grill table is designed to save space, making it an excellent addition for those with smaller patios or yards. When not in use, it can be easily collapsed and stored, making it a versatile piece of furniture for any outdoor occasion.

Gathering Your Materials

Building your fold-up grill table doesn't require an elaborate list of materials. The construction can be done using just a few basic tools including a drill, a saw, and clamps, along with quality cedar boards which are known for their durability and weather resistance. Purchasing extra wood is advisable, as extra cuts may be needed during construction.

Step-by-Step Instructions for Building Your Grill Table

1. **Start with Precise Cuts**: Accurate cuts are critical for ensuring your table is stable and functional. Using a square can help you achieve straight cuts, whether you're using a handsaw or an electric jigsaw.

2. **Leg Assembly**: By clamping two boards together and cutting them simultaneously, you can create identical leg pairs to ensure uniformity in your project. Drill appropriate holes for bolting the legs before unclamping.

3. **Final Assembly**: After attaching the legs, position stretchers for added support. Pay attention to aesthetic details, as a well-constructed table can also serve as a striking accent in your outdoor space.

Additional Tools and Techniques

In addition to basic construction tools, consider using waterproof wood glue with your screws for enhanced durability. This will provide your table with a sturdy construction that can withstand various weather conditions, ensuring it serves you well for years to come.

The Fun of DIY: Crafting with Family and Friends

This project isn't just about building a table; it's about creating lasting memories with loved ones. Working hand-in-hand with family or friends on DIY projects strengthens bonds while providing a sense of accomplishment. Everyone can learn valuable home maintenance skills and gain pride in contributing to the household.

Future Trends in Outdoor Projects

As outdoor living spaces become extensions of our homes, investing time into creating functional furniture is gaining traction. Beyond grill tables, multifunctional furniture such as dining carts and storage solutions are becoming increasingly popular. Embracing this trend can elevate your outdoor space, making it more inviting and efficient for entertainment.

Common Misconceptions: DIY Isn't for Everyone

Many people shy away from DIY projects due to misconceptions about required skills. However, with step-by-step plans and accessible resources, anyone can tackle these tasks successfully. Embrace the challenge, and you’ll see results that reflect your effort.

Final Thoughts on Your DIY Journey

Creating your own fold-up grill table can transform your outdoor cooking experience and provide practical benefits. As you undertake this project, remember to enjoy the process. Each cut, each bolt, brings you closer to a personalized space where you can create memorable moments with family and friends.

If you feel inspired to start this project, gather your materials and get to work. A beautifully crafted grill table awaits and will surely be a centerpiece for all your future barbecues!

DIY Home Projects

0 Comments

Write A Comment

*
*
Please complete the captcha to submit your comment.
Related Posts All Posts
03.14.2026

OSB Furniture Revolution: Build Your Own Stylish Coffee Table Today

Update Transforming OSB into Stunning Furniture In the world of DIY home projects, OSB (oriented strand board) often gets overlooked. However, this sturdy and affordable material can transform into beautiful, functional pieces for your home. This article showcases how a simple coffee table can change the perception of OSB, making it a stylish addition to any living space. A Day of Creativity: Building Your Own Coffee Table Building a coffee table out of a single sheet of OSB is not just a DIY project—it's an invitation to unleash your creativity. Taking just a day and costing approximately $75 to $100, this intermediate-level project can reinvigorate your home decor while demonstrating the beauty that OSB has to offer. You don’t need to be a master carpenter; simply follow the step-by-step guide for a successful outcome. Why Choose OSB for Furniture? OSB provides several advantages over traditional wood. Not only is it more environment-friendly due to its composite nature, but it can also be incredibly durable when sealed and finished properly. Enthusiasts of sustainability and cost-effectiveness are increasingly opting for OSB to create eye-catching furniture without breaking the bank. In a time when home improvement projects can quickly become expensive, having an affordable alternative like OSB opens doors for all DIY lovers. Hands-On Tips for Working with OSB Before diving into your project, it’s essential to understand the materials and tools needed. Here's a summary of what you'll need to get started: Tools: A jigsaw, drill/driver, clamps, a random orbit sander, and a miter saw. Materials: One 3/4" x 4' x 8' OSB sheet, brad nails, threaded rods for added support, and polyurethane for finishing. Each step is crucial, from trimming and cutting the boards to crafting the unique corbel design that will elevate your table's aesthetics. Don’t rush the sanding and finishing process, as this will highlight the unique textures of OSB. Common Misconceptions About OSB Many people associate OSB with low-quality and temporary structures, which is a misconception. When sealed and treated correctly, OSB can look stunning and provide a long-lasting addition to your home decor. The finished product can resemble high-end wood, with rich textures and natural hues that add warmth and personality to your living space. Inspiration from Other DIY Projects A blog post by Homegrown Spud showcases a couple who successfully created their own OSB tables. Their experience echoes similar sentiments—OSB can yield beautiful, functional products that fit within one’s desired aesthetic. Choosing this material allowed them not only to save money but also to showcase their unique style. Join the Movement Towards Sustainable Furniture As society becomes increasingly conscious about sustainability, DIY projects with OSB can serve as both a creative outlet and a responsible choice. By selecting materials that are generated through sustainable practices, DIY enthusiasts are contributing to a more eco-friendly lifestyle. Embracing OSB can inspire innovative projects while also providing solutions for modern living—one coffee table at a time. So gather your tools, set aside some time, and start crafting your custom furniture project!

03.12.2026

Unlock Sparkling Clean Sinks: Discover How to Use Dishwasher Tablets!

Update Transform Your Kitchen Sink with This Simple Hack Are you tired of dealing with stubborn sink stains and the endless scrubbing that seems to never yield satisfying results? Here’s a revolutionary solution that could change your cleaning game significantly—dishwasher tablets! This hands-free cleaning hack isn’t just a gimmick; it cleverly utilizes the same technology that keeps your dishes spotless, and you’ll be amazed at the results. The Magic of Dishwasher Tablets Dishwasher tablets are designed to dissolve grime and grease in the high-temperature environment of a dishwasher and they can bring that same efficiency to your kitchen sink. Imagine tossing a tablet in, filling your sink with hot water, and letting the hard work be done for you. It’s a far cry from traditional scrubbing methods that can leave your arms sore and your sink still dirty. Step-by-Step: How to Make Your Sink Shine Here’s how to harness the power of a dishwasher tablet for your sink: Remove all dishes and items from the sink. Insert a drain stopper and fill the sink with hot water. Drop in one dishwasher tablet and allow it to dissolve for about 15 minutes. Let the solution sit for at least two hours or even overnight for tougher stains. Drain, rinse with clean water, and wipe down with a clean towel. This process not only brightens your sink but ensures that the harsh chemicals usually found in household cleaners are circumvented. Considerations Before You Start While the idea is comforting, some precautions are necessary. Not all dishwasher tablets are created equal; look for plastic-free options to prevent plumbing issues. The harsh ingredients in these tablets can irritate your skin and eyes, so wearing gloves is advisable. Avoid using these tablets on delicate surfaces like porcelain or ceramic as they can scratch or dull the finish. Tips for Maintaining Your Sparkling Sink After you’ve achieved shininess, keeping your sink in prime condition is simple: Rinse your sink after each use to avoid food particle buildup. Avoid letting dirty dishes sit for long; clean them promptly. Use a sink strainer to catch debris, and empty it regularly. Taking these small steps can significantly reduce the frequency of deep cleaning. Common Misconceptions and Myths Many people believe that cleaning requires extensive effort and numerous products. However, using a dishwasher tablet proves that a single product can effectively tackle several cleaning jobs around the house. This not only saves time but also reduces clutter in cleaning supplies. Final Thoughts: A Clean Sink, A Happy Home By using dishwasher tablets, you’re not just cleaning your sink; you’re making a statement about ease and efficiency in household maintenance. It’s one small change that can have a dramatic impact on your cleaning routine and overall satisfaction with your kitchen space. So why not give it a try? Next time your sink is in need of some TLC, pop in a dishwasher tablet and let it work its magic. You'll likely find yourself with a brilliantly shining sink and a newfound appreciation for the power of modern cleaning products!

03.11.2026

Transform Your Home: A Simple Guide to Installing a Ceiling Light Medallion

Update Elevate Your Space: The Magic of a Ceiling Light Medallion When it comes to home decor, minor details can transform a room from ordinary to extraordinary. One such detail that packs a punch is the ceiling light medallion. This elegant addition not only enhances the beauty of your lighting fixture but also adds a striking visual element to your ceiling. In this article, we will guide you through the straightforward process of installing a ceiling light medallion, which can breathe new life into your interiors. Why Choose a Ceiling Light Medallion? Ceiling light medallions are a fantastic way to add both character and sophistication to any space. They come in various styles—from ornate traditional designs to sleek, modern options—allowing you to match them with your home’s aesthetic. For homeowners looking to create a cozy yet whimsical atmosphere, as described in the renovation story of a dining room makeover, a medallion can be a standout feature. Pairing it with a contemporary light fixture creates a captivating contrast, proving that traditional elements can coexist harmoniously with modern designs. Gather Materials Before You Start The process begins with gathering the necessary materials. You’ll need: Ceiling Medallion Construction Adhesive Paint (optional) Caulk Tools: Painter’s tape, pin nails or tape, and caulk gun Having everything at hand will streamline the installation process and save you from multiple trips to the hardware store. Prep Work: Removing the Current Light Fixture Installing a ceiling medallion isn’t complicated, but there’s a little prep work before you get started. You will first need to carefully remove the existing light fixture. This step is vital; working around the fixture could result in damage to both your light and the ceiling. Take a moment to turn off the circuit breaker to avoid any mishaps while you handle the wiring. Perfecting the Paint Job Before applying the medallion, take the time to paint it. While medallions often come primed, a fresh coat of paint—preferably the same color as your ceiling—will ensure a polished look. This detail makes a world of difference, providing a seamless integration into your ceiling. If you're feeling bold, consider contrasting colors for a unique flair! Attach the Medallion with Ease With your light fixture safely out of the way and your medallion painted, it’s time to attach it. Apply a generous amount of construction adhesive to the back of your medallion. Position it carefully against the ceiling, pressing firmly to ensure it adheres well. To keep the medallion in place while the adhesive sets, use painter’s tape for a few hours. If you want added support, you can use pin nails, though this is optional. Finishing Touch: Caulking for a Sleek Finish As the final touch, caulk around the edges of the medallion for a seamless appearance. This helps hide any gaps and offers extra security, ensuring the medallion sits flush against the ceiling. Once the caulk dries, you can go ahead and reinstall your light fixture. The result? A chic and polished ceiling that invites compliments and elevates your room. The Transformational Impact Many homeowners are surprised at how such an affordable project—typically under $20—can significantly enhance the aesthetics of a room. It’s an easy way to achieve high impact without breaking the bank. As this project emphasizes, thoughtful details make all the difference in home décor. Broader Impacts and Future Trends The rise of DIY home projects has inspired many to take on renovations themselves, with light fixtures and ceiling treatments becoming popular focal points. As trends shift towards a mix of traditional and modern designs, ceiling medallions remain timeless. They not only elevate the decor but also reflect a homeowner's personal style and creativity. Share Your Journey Once you have installed your ceiling light medallion, the next steps involve accessorizing and personalizing your space. These finishing touches, like selecting curtains and artwork, contribute to the overall atmosphere you want to achieve. If you’re inspired to try this project yourself, take the plunge! Your space deserves these thoughtful enhancements that resonate with your unique style. For more home decor inspirations and DIY projects, keep following along!

Terms of Service

Privacy Policy

Core Modal Title

Sorry, no results found

You Might Find These Articles Interesting

T
Please Check Your Email
We Will Be Following Up Shortly
*
*
*