UPDATE
  • Home
  • Categories
    • Cleaning & Moving
    • Maintenance / Repairs
    • Remodeling & Construction
    • Landscaping / Outdoor
    • Security & Technology
    • Sustainability, Health & Safety
    • Interiors / Décor
    • Expert Interviews
    • DIY Home Projects
Home Wise News!
Wise Insights, Reliable Contractor Advice & Hands on DIY Know How for Savvy Homeowners
May 10.2025
3 Minutes Read

Unlock the Secrets: How to Build Your Own Simple DIY Raised Garden Bed

DIY raised garden bed plans in a backyard with wooden fence.

Transform Your Space: Building a DIY Raised Garden Bed

Creating a thriving garden in your backyard is a fulfilling project, especially if you’re constrained by rocky soil or shaded areas. A DIY raised garden bed offers a versatile solution, allowing you to customize your planting space while keeping your back happy. Whether you are a seasoned gardener or just getting your hands dirty for the first time, building a raised garden bed can simplify your gardening experience and enhance the beauty of your outdoor space.

Understanding the Benefits of Raised Garden Beds

Raised garden beds are not just practical; they enrich the entire gardening experience. One of the main advantages is that they can be tailored to your specific needs. Whether you want them closer to the ground for easy access or elevated to save your back, the design can be adapted to fit your gardening preferences. Furthermore, they can greatly improve soil quality. By building your bed with nutrient-rich soil, you can create a mini-ecosystem that promotes healthier plants. Additionally, raised beds typically offer better drainage compared to in-ground options, which is crucial for preventing waterlogging and root rot.

Choosing the Right Design for Your Space

When deciding on a design for your raised garden bed, consider the space you’re working with. If your backyard is small or features numerous trees, a raised garden bed that stands on legs can offer the perfect solution. This model allows gardening without the hassle of bending or kneeling, making it ideal for seniors or those with mobility issues. However, if you prefer to have complex irrigation systems, traditional designs built directly on the ground may be more appropriate.

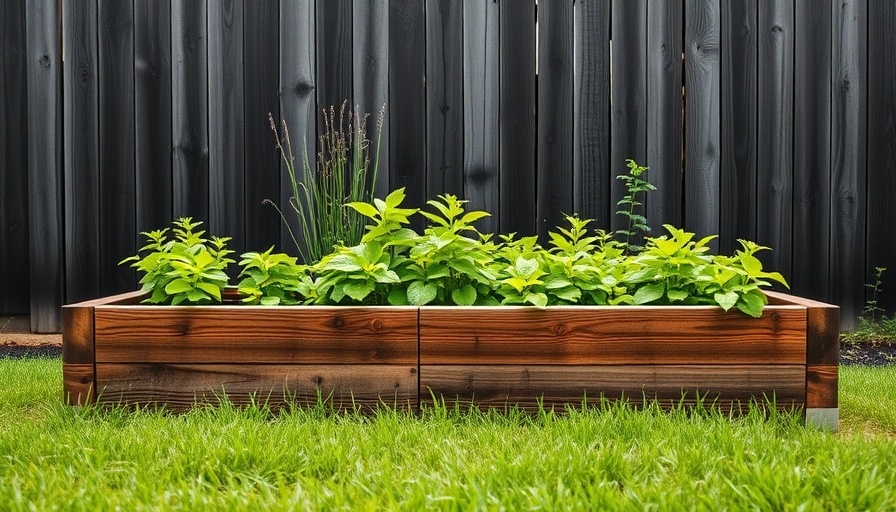
Options for materials are abundant, from wood and stone to recycled pallets. Cedar wood, known for its rot resistance, is a popular choice. Alternatively, bricks or concrete blocks can provide a stylish and durable option that also helps with weed control. If you want to add a touch of creativity, consider building a garden bed out of old furniture or other reclaimed materials.

Step-by-Step Guide to Building Your Own Raised Garden Bed

Once you've settled on your design, it's time to gather materials and tools. Here's a basic list to get you started:

  • (12) 8' cedar 1×4 boards
  • (4) 8' cedar 2×4 boards
  • 1 roll of 2' wide chicken wire
  • 1 roll of landscaping fabric
  • Drill
  • Staple Gun
  • Corner Clamps
  • Stain or paint (optional)

Before you jump into construction, remember to weigh the pros and cons of your material choices. While cedar is safe and sustainable, pressure-treated wood has become a popular alternative, though some still have concerns about its potential leaching of chemicals into the soil. Make your selections carefully, keeping the health of your garden as your top priority.

Enhancing Your Gardening Experience

After the construction of your raised garden bed, consider how to enhance your gardening experience. For example, installing a drip irrigation system can save you time and effort, ensuring your plants receive consistent moisture. You may also want to layer your soil to maximize nutrition. Start with a base of larger stones to promote drainage, followed by compost and nutrient-rich soil for optimum growth.

Gardening should be an enjoyable endeavor. Prevent weeds by lining the base of your bed with landscaping fabric or using chicken wire, which can also deter pests. Keep your garden bed organized by planting companion plants—some plants can protect others from pests or enhance growth.

Closing Thoughts: Start Your Gardening Adventure Today!

Building a DIY raised garden bed opens the doors to endless gardening possibilities, transforming your space into a productive oasis. With the right design and ingredients, you can cultivate vibrant flowers or a variety of vegetables tailored to your taste. Garden beauties aren't just for the expert; they are achievable by anyone willing to foster their green thumb.

Ready to embark on your gardening adventure? Gather your materials and start building today! Taking the first step toward creating your garden can be as easy as following the actionable insights shared. You’ll soon find the fruits (and vegetables) of your labor certainly rewarding.

DIY Home Projects

0 Comments

Write A Comment

*
*
Please complete the captcha to submit your comment.
Related Posts All Posts
05.01.2026

Master the Art of Styling Built-In Shelves for Every Home

Update Discover the Art of Styling Built-In Shelves Styling built-in shelves isn’t just about aesthetics; it’s an opportunity to reflect personal style while enhancing the functionality of your home. For homeowners tackling this design aspect, understanding how to create visually appealing yet practical shelves can transform your living space. Here, we’ll explore key tips that will have you styling shelves like a pro in no time! Understanding Practicality: The Foundation of Your Design Before delving into design elements, it’s essential to consider the fundamental question: What purpose do your built-in shelves serve? Are they for storage, display, or a blend of both? For instance, in my own bedroom, I wanted to create a display that was visually captivating yet functional. Incorporating a lamp for lighting and baskets for hidden storage allowed me to keep the design practical. This practice not only helped me utilize the shelves effectively but also enriched the room's aesthetics. Variety is Key: The Role of Texture, Height, and Weight One of the golden rules of decor is to introduce variety. When styling shelves, ensure an assortment of textures, heights, and weights. Tall, slender vases paired with short, dense books can add visual interest and create a striking contrast. As you style, don’t hesitate to play around with the arrangement! Step back frequently to assess balance across your shelves. If one side feels heavy, adjust by incorporating lighter items on the opposite side. This diagonal balance strategy can significantly elevate your design. The Power of Odd Numbers: Grouping for Aesthetic Appeal While styling, remember that odd-numbered groupings are more visually appealing. For example, three items arranged in a triangular formation create a dynamic look that draws the eye. This is a simple yet effective strategy, especially when you’re just starting. Although this guideline can be bent based on personal preference, it’s a great place to begin if you’re unsure how to group your decorations. The balance it brings creates a sense of harmony that invites one to explore your shelves further. Don’t Fear the White Space: Embracing Breathing Room One of the most common pitfalls in styling shelves is overcrowding them. More items do not always equate to a better look! Embrace the white space—this emptiness allows viewers to rest their eyes and appreciate the individual pieces on display. Strategically leaving areas free of decor, whether horizontally or vertically, establishes a visually pleasing layout that feels intentional. Pair taller and shorter items to create this effect, allowing the eye to travel naturally across your shelves. A Balance of Practicality and Visual Appeal The final crucial tip—step back and take a look! This not only applies to styling but also allows you to assess the usability of the space. You must feel satisfied with both the functionality and aesthetics of your shelves. As you play with items, don’t rush the process; it takes practice to perfect this art. Examine how light plays across your decor and how various objects work together to tell a story. Iteration is your friend! Creating Your Own Shelf Styling Strategy Incorporate your personality into the shelf design! Consider the items that resonate with you—whether family photographs, treasured books, or artistic decorations. By strategically combining practicality and personal flair, your shelves will not only serve a functional purpose but will also express who you are as a homeowner. In Summary Styling built-in shelves can reflect your individuality while providing an organized and functional living space. Use these tips as a foundation: balance practicality with visual appeal, embrace white space, and remember to style with purpose using diverse textures and odd-numbered groupings. Transforming your shelves into a showcase of personal style is an exciting journey—one that can enhance not only the aesthetic of your home but also the joy it brings to daily life. As you embark on your shelf styling journey, don’t hesitate to experiment! The beauty of interior design lies in its flexibility and the personal touch you bring to each project. Listen to your instincts, and your shelves will tell a beautiful story.

05.01.2026

Master the Art of Removing Drywall Anchors Without Damage

Update Understanding the Different Types of Drywall Anchors Before you dive into the process of removing drywall anchors, it’s crucial to identify the kind of anchor you’re dealing with. There are several types that homeowners commonly encounter: Plastic Expansion Anchors: These are small, typically ribbed, and available in colors like white or blue. They're perfect for lightweight applications. Self-Drilling Anchors: Often metal and threaded, these anchors are designed for easier removal, making them beginner-friendly. Metal Hollow Wall Anchors (Molly Bolts): These anchors are ideal for heavier items, providing strong support in drywall. Toggle Bolts: With spring-loaded wings, toggle bolts can handle a substantial load and their removal is quite straightforward. A Gentle Approach: Tools and Techniques for Removal Removing anchors without causing damage requires a careful strategy. Here are effective methods tailored to the type of anchor you’re dealing with, ensuring a clean home improvement experience: 1. Unscrewing Self-Drilling Anchors This is the simplest method for self-drilling anchors: attach a screwdriver, turn counterclockwise, and pull gently. If you encounter resistance, apply light outward pressure while unscrewing. 2. Carefully Extracting Plastic Anchors If you have plastic anchors, use needle-nose pliers to grasp and wiggle them out gently. Slow and steady is key—this avoids unnecessary damage to your drywall. 3. The Clever Push-Method Sometimes, pushing the anchor back into the wall can save you from added damage. Cut off the visible piece of the anchor and gently push the remainder into the cavity. This technique often leaves a much smaller hole to patch later. 4. Dealing with Toggle Bolts Toggle bolts require a different approach. Once the screw is removed, the wings will naturally fall back into the wall, leaving no extra work for you. These can stay hidden behind the drywall. Aftermath: Properly Patching Your Wall No matter how careful you are, small holes will often remain. Here’s how to fix them: Small Holes: Use lightweight spackle applied with a putty knife. Sand once dry for a smooth finish. Larger Holes: Apply spackle in thin layers, allowing each layer to dry completely before adding more as necessary. Finish with a touch-up of paint to blend in. Avoiding Common Mistakes Many homeowners find themselves frustrated with drywall anchor removal. To avoid a mess, remember these key tips: Pulling Too Hard: This is a surefire way to create larger holes. Identifying the Anchor: Ensure you know which type of anchor you’re dealing with before attempting removal. Forcing Out Stubborn Anchors: If it resists removal, switch methods—consider pushing it into the wall instead. Concluding Thoughts: What Homeowners Should Know With the right mindset and tools, removing drywall anchors doesn’t have to end in disaster. Each method discussed here is designed to minimize wall damage and allow for straightforward repairs afterward. The satisfaction of doing it yourself not only saves you money, but also empowers you as a homeowner. As you embark on your home improvement journey, consider these insights and tips your go-to resources for potential DIY projects. Remember, being informed and strategic in your approach can turn a daunting task into a manageable one. Happy renovating!

04.30.2026

Maximize Your Thrifting Strategy: Best Times for Unbeatable Finds

Update Unlock the Secrets of Thrifting: Timing is Everything If you've ever found yourself wandering the thrift store aisles, dreaming of uncovering hidden treasures, understanding the art of timing can be your greatest ally. Thrifting may seem simple, but experts reveal that it’s laden with strategy—particularly when it comes to knowing the best times to shop. In this guide, we unveil not only the prime times for thrifting but also insights to enhance your experience and scores. Why Timing Matters for Thrifting “Thrifting is definitely seasonal, just like any other retail shopping,” says Jennifer Moore, a thrifting enthusiast and influencer. The start of the year is particularly fruitful due to the overflow of items as people cleanse their homes post-holidays. But that's just one of several seasons that savvy thrifters should mark on their calendars. The Best Time: January New Year’s resolutions often lead to decluttering, which results in a treasure trove of fresh inventory hitting thrift store shelves. With post-holiday clean-outs, many donors are looking to offload unused gifts and items that no longer serve them. Rhiana Sherwood from Goodwill emphasizes, “January is the top month for quality finds, as many people donate items with the tags still on them.” Exploring thrift stores in this month can feel like a rewarding scavenger hunt amid the post-holiday ceremonial purging. Spring Cleaning Brings New Finds As the weather brightens, so does the influx of items at thrift stores. Mid-March through early April marks another peak time for thrifters. This seasonal shift prompts homeowners to clean and donate, leading to increased availability of gently used home goods, clothing, and furniture. “This time of year is when people swap out their winter decor for spring looks,” notes Lindsey Sopcak, a pro-thrifter. Furthermore, large companies often donate excess stock, so it’s common to spot brand-name items. Back to School: A Hidden Gem of a Time As families prepare for a new school year, thrifting during early fall offers a different set of benefits. Sherwood observes an uptick in clothing donations, especially kids’ items that are gently used as children grow out of them. Colleges also see students hunting for affordable home goods for dorms. From clothing to small furniture, savvy shoppers looking for deals will find plenty to choose from this time of year. Expert Tips to Enhance Your Thrifting Experience Your success in thrift shopping can be elevated by following expert tips. For instance, calling your store ahead of time can inform you about specific inventory arrival days or any special sales that might occur. Furthermore, some thrift stores see consistent waves of donations, so timing your visits around known schedules can yield better treasures. Patience is a Thrifter’s Best Friend Thrifting may often require an adventurous spirit combined with a bit of patience. Not every trip will yield an impressive find. Sometimes the thrill lies in the search—waiting for the right pieces to emerge rather than rushing for the first shiny object. The journey itself in such quirky shops can uncover stories and memories behind each item. Understanding What to Look For Thrifting is about finding not just any item, but items that resonate with you. Keep an open mind and look beyond the obvious. Quality decor, statement clothing, and even unique books can often be overlooked amidst the more common offerings. Adventurous thrifters sometimes venture into surprising finds, like vintage kitchenware or collectibles that may be worth a fortune when the right buyer comes along. Closing Thoughts on Achieving Thrifting Success Mastering the timing of your thrift store escapades can profoundly affect your findings. With a keen eye on seasonal patterns and expert insight, each visit has the potential to transform into a treasure hunt. So grab your reusable shopping bag, mark your calendar, and prepare to unearth uniquely crafted pieces that tell stories of their own. Ready to thrifting?

Terms of Service

Privacy Policy

Core Modal Title

Sorry, no results found

You Might Find These Articles Interesting

T
Please Check Your Email
We Will Be Following Up Shortly
*
*
*