Add Row
Add Element
UPDATE
Add Element
  • Home
  • Categories
    • Cleaning & Moving
    • Maintenance / Repairs
    • Remodeling & Construction
    • Landscaping / Outdoor
    • Security & Technology
    • Sustainability, Health & Safety
    • Interiors / Décor
    • Expert Interviews
    • DIY Home Projects
Home Wise News!
Wise Insights, Reliable Contractor Advice & Hands on DIY Know How for Savvy Homeowners
August 13.2025
2 Minutes Read

Unlock Hidden Diamond Painting Tricks for Stunning Artwork

Paint With Diamonds tricks, close-up of a hand using a tool on canvas.

Discover the Hidden Techniques of Painting with Diamonds

Painting with diamonds is not just a leisurely pursuit; it's an art form that can yield stunning results with the right techniques. As you immerse yourself in this creative endeavor, you'll find that knowing expert secrets can dramatically enhance your experience. This guide is your roadmap to unlocking those expert tricks that elevate your diamond painting from simple enjoyment to a refined artistic craft.

Choosing the Right Paint with Diamonds Kit

Your journey begins with selecting a high-quality diamond painting kit, as this step is crucial for achieving optimal results. A great kit ensures not just vivid colors, but also long-lasting enjoyment. Look for kits that feature:

  • A canvas with a clear, strong adhesive for lasting adherence
  • High-quality resin drills that shine
  • A complete toolset, including a multi-placer and wax pen
  • Pre-sorted diamonds to avoid confusion
  • Protective packaging to keep your materials safe

A poor-quality kit can lead to misalignment or fading colors, so take the time to make an informed choice.

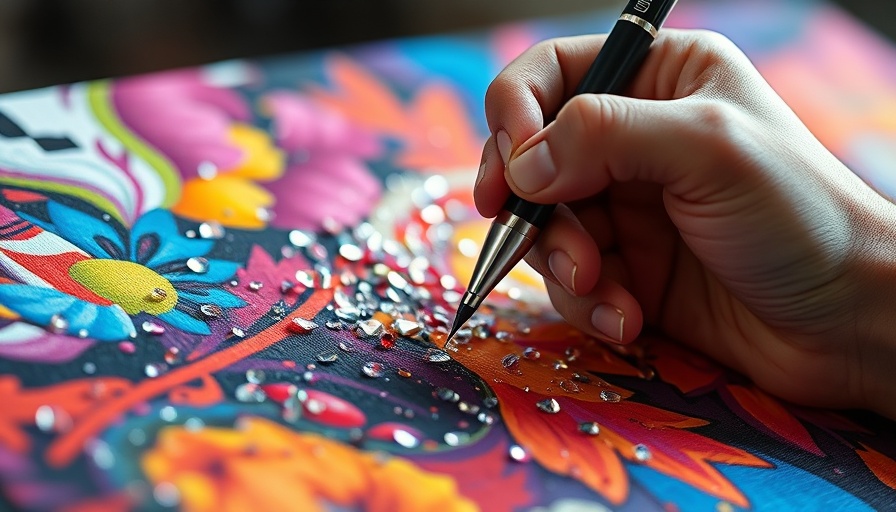
Understanding Drill Types: Square vs. Round

Choosing between square and round drills can significantly affect your painting experience. Square drills are perfect for intricate designs because they fit together without gaps, offering a polished finish. They require precision, making them suitable for more experienced painters. Conversely, round drills, easier to handle, are great for beginners and provide a softer look with less emphasis on perfect alignment.

Why Canvas Quality Matters

The quality of your canvas can make or break your painting. A durable canvas with strong adhesive prevents frustrations during the crafting process. Look for:

  • Clear symbols to avoid mistakes
  • Thicker material for resistance against creases
  • Waterproof and fade-resistant coatings for longevity

Low-quality canvases can ruin your artistic meticulously crafted piece, making quality essential.

Tool Tips for Precision and Efficiency

Utilizing the right tools can streamline your painting process significantly. Here are key tools you might consider:

  • Light Pad: Enhances visibility and reduces eye strain.
  • Multi-Placer Pen: Lets you apply multiple drills simultaneously.
  • Angled Tweezers: Perfect for adjusting misplaced drills.
  • Storage Containers: Keeps your diamonds organized to prevent mix-ups.
  • Roller Tool: Ensures secure placement of drills.

By investing in these tools, your diamond painting experience becomes quicker and more enjoyable.

Ready to Master Your Painting with Diamonds Experience?

Armed with these expert tricks, you're set to transform your diamond painting sessions. Each technique and tool mentioned plays a crucial role in enhancing both your artistic results and enjoyment of this creative outlet. Why wait to create stunning artwork? Now is the perfect time to dive into this rewarding hobby.

DIY Home Projects

Write A Comment

*
*
Related Posts All Posts
08.13.2025

Transform Your Driveway: The Affordable DIY Crack Repair Guide

Update Transform Your Driveway: The Affordable DIY Crack Repair Guide Cracks in a concrete driveway can be unsightly and troublesome, but fixing them doesn’t have to break the bank. With a modest budget of $10 to $60 and just a few hours of work, you can enhance your property’s aesthetic and value. This comprehensive guide unpacks a practical approach to driveway crack repair, helping you effectively tackle those dastardly splits in your concrete surface. Why Do Driveways Crack? Understanding why your driveway is cracking can inform your repair strategy. Concrete can crack due to several factors including temperature changes, moisture, heavy traffic, and even soil conditions beneath the surface. For homeowners interested in DIY projects, knowing these factors not only helps in effective repairs but also in preventing future issues. For instance, if your driveway is subjected to a lot of moisture, consider applying a sealant that helps repel water to mitigate cracking in the first place. The Essential Tools and Materials You Need To get started, you will need a few tools and materials: Tools: Caulk gun, chip brush, leaf blower or broom, pocket knife, screwdriver, shop vac, spray bottle. Materials: Backer rod, concrete crack filler, disposable gloves, sand, small dowel. Gathering these items before you start will accelerate your repair process and ensure you don’t have to pause for missing materials. Step-by-Step Guide to Fixing Driveway Cracks Follow these steps to repair your driveway cracks like a pro! Step 1: Choose Your Crack Filler Wisely There are two primary types of concrete crack fillers: self-leveling and non-sag. Self-leveling fillers are ideal for filling narrow and irregular cracks as they flow into place with ease. Alternatively, non-sag fillers are thicker, making them suitable for filling larger cracks or vertical surfaces. For most homeowners, self-leveling options provide the best results with minimal effort. Step 2: Preparation is Key Before applying the filler, ensure the area is clean and dry. Use tools like a shop vac and chip brush to clear out debris and weeds. A properly prepared surface allows the filler to adhere better, ensuring a longer-lasting repair. Step 3: Filling in Cracks When you’re ready to fill, cut your caulk tube at a steep angle. Filling the crack thoroughly is crucial, so pour the filler generously, allowing it to settle into place. For deeper cracks, be sure to add a backer rod first, as this will provide support and continuity for the filler. Step 4: Final Touches After filling the crack, let the filler dry per the manufacturer’s instructions. Depending on the weather conditions, this might vary. Keeping the area clear of foot traffic and moisture during this time is essential to achieving a successful repair. Step 5: Seal Your Driveway For enhanced durability, consider sealing your driveway once repairs are complete. Sealing not only protects your recent repairs but can also improve the overall look of your driveway, extending its lifespan. Most sealants should be applied once the temperature is consistently above 60°F and there’s no rain expected. Benefits of Tackling DIY Driveway Repairs DIY driveway repairs present numerous advantages. Firstly, homeowners save money by avoiding costly contractor fees. Secondly, engaging in DIY projects empowers you with a sense of accomplishment and equips you with handy skills for future home maintenance. Furthermore, the flexibility of doing it at your convenience eliminates the hassle often associated with scheduling laborers. Investing a few hours now not only pays off in current repairs but also in maintaining property value and future peace of mind. Conclusion: Ready, Set, Repair! Your driveway is one of the first things visitors see, and maintaining it is essential. With these practical tips, you can effectively repair cracks and enhance your home's curb appeal without incurring hefty expenses. Don’t underestimate the impact that tidy, well-maintained concrete can have on your property’s value! If you're passionate about home maintenance, consider signing up for a newsletter or a DIY workshop that details more projects like this, ensuring you continue to develop your handyman skills. Remember, the best repairs are the ones you take on yourself!

08.13.2025

Discovering the Timeless Legacy of the Katana Sword: Types and Insights

Update Decoding the Allure of the Katana Blade For centuries, the katana sword has represented more than just a weapon; it embodies the principles of honor, skill, and craftsmanship inherent in Japanese culture. When considering a purchase, it’s essential to understand that you are not merely acquiring a sword but rather a piece of history. This connection resonates with collectors and martial artists alike, making the katana a timeless item of both practical and aesthetic value. The Distinctiveness of Katana Sword Types Numerous varieties of katana exist, each offering unique attributes. The shinto, often characterized by its mayhem of complex and intricate ornamentation, serves as a prime example of both beauty and functionality. Alternatively, the tachi, with its slightly longer blade, caters to mounted combat, showcasing the diversity within this singular category. Each type delivers not just a different experience of handling but reflects the historical application and cultural significance behind its design. Why Collecting a Katana Matters For avid collectors, the value of a katana goes beyond its physical attributes; it's about the legacy it carries. Ownership of a genuine katana allows one to connect deeply with the Japanese warrior culture, exemplifying not just a collector’s pride but also an appreciation for the artistry and skill involved in forging these swords. Collecting katanas can often ignite a passion for learning more about their history, the intricate crafting techniques, and even the samurai who wielded them. Practical Uses Beyond Collecting Katana swords are not just for display in a collection; many practitioners of martial arts utilize them to enhance their skills. Kendo and iaido, for instance, incorporate the katana for training and competitions, highlighting the sword's important role in martial arts beyond mere decoration. This practical application underscores the balance between form and function, letting enthusiasts appreciate both the beauty and utility of the blades. Final Thoughts on Your Katana Quest As a potential buyer or collector, being informed is crucial. A katana is not just a sword—it’s a bridge to a storied past and an ongoing tradition. With the right knowledge, you can acquire a piece that resonates with you—not just as a weapon, but as a symbol of artistry, culture, and legacy. Always consider consulting trusted experts or authentic sources to ensure the heritage and authenticity of your katana. Step into this journey with not just enthusiasm, but a commitment to understanding the rich history that each blade represents.

08.10.2025

Discover 10 Time-Tested Cleaning Tricks Southerners Swear By!

Update Rediscovering Old-School Cleaning Tricks When it comes to home cleaning, there’s something irresistibly charming about the time-tested methods that have been passed down through generations. Old-school cleaning tricks often carry a sense of nostalgia and practicality that modern techniques sometimes overlook. Due to their effectiveness and simplicity, many Southerners swear by these traditional methods. In this article, we explore ten old-school cleaning tricks that not only promise to make your home sparkling clean but may also evoke a sense of comfort and warmth, reminiscent of the good ol' days. 1. Vinegar: The All-Purpose Cleaner No cleaning arsenal is complete without a trusty bottle of vinegar. This versatile liquid is popular in Southern households for a reason; it effectively cuts through grime and deodorizes at the same time. A simple solution of equal parts vinegar and water can tackle everything from windows to kitchen countertops. Not to mention, it’s environmentally friendly, making it perfect for those looking to keep their homes clean and green. 2. Baking Soda: Your Secret Weapon Against Stains Baking soda isn’t just for baking! This gentle, non-toxic abrasive is an excellent stain remover. Sprinkle some on carpets or upholstery, let it sit for a few hours, and vacuum it up for a fresher and cleaner home. For those stubborn stains on pots and pans, a paste made with water and baking soda can work wonders. 3. Reusable Cloths Over Paper Towels In an age of disposable products, many Southerners still prefer to use old dish towels or rags for cleaning tasks. These reusable cloths are not only more sustainable, but they also boast a durability that’s unmatched by one-time-use paper towels. A moist cloth can handle almost any surface without scratching, making it a reliable choice for sweat-inducing cleaning tasks. 4. Castile Soap: A Gentle Clean This vegetable-based soap is a Southern secret for a gentle clean. Whether it’s for hand-washing dishes or creating foaming handwash, Castile soap is safe for various surfaces and biodegradable, aligning perfectly with a more sustainable lifestyle. 5. Lemon Juice: Nature’s Freshener Lemon juice isn’t just for sweet tea! Its natural acidity makes it a powerhouse for cleaning, especially in kitchens. It can cut through grease and grime and leave surfaces smelling fresh. Rub a lemon half on cutting boards to disinfect and enjoy its fresh scent wafting through your kitchen. 6. Olive Oil for Shining Furniture Forget those commercial furniture polishes; a little olive oil on a soft cloth can make your wooden surfaces shine and smell delightful. Just mix it with some vinegar for an extra boost, and you’ve got a homemade solution that makes your furniture look brand new! 7. Cornstarch for Windows and Upholstery This kitchen staple isn’t just for thickening your favorite soup. Cornstarch can help fluff up rugs and clean windows with an impressive shine. Mix it with vinegar to create an effective window cleaner that won’t leave streaks behind. 8. Old newspaper: The Ultimate Glass Cleaner Still using paper towels to clean your mirrors? It might be time to switch it up! Old newspapers, when used dry, can actually give your glass surfaces a streak-free shine. Plus, it’s a great way to recycle those papers piling up in your recycling bin. 9. Essential Oils: Scenting Your Space Naturally Infusing your cleaning routine with essential oils can make a world of difference. A few drops of therapeutic-grade oils like tea tree or lavender can enhance your homemade cleaning solutions with delightful scents and added antibacterial properties. It’s a Southern touch that brings relaxation to chores! 10. The Trusted Mop and Bucket In an era dominated by robotic cleaners, there’s still something special about the traditional mop and bucket. Many Southerners find joy in mopping their floors manually, relishing in the satisfaction of a job well done. The simple act of scrubbing can be therapeutic and allows for a deep clean that machines may miss. Implementing These Tricks Today Many of these cleaning hacks are not just effective; they're also a wonderful reminder of the simpler times. Adopting these old-school tricks can make household chores less daunting and create a comforting atmosphere that feels like home. As you embark on your cleaning endeavors, consider integrating one or more of these timeless methods into your routine. Maintaining a clean home doesn’t have to rely solely on high-tech gadgets or commercial products. Sometimes, the best solutions come from our past. So, roll up your sleeves, get a little elbow grease going, and enjoy the classic charm of these old-school cleaning tricks today!

Terms of Service

Privacy Policy

Core Modal Title

Sorry, no results found

You Might Find These Articles Interesting

T
Please Check Your Email
We Will Be Following Up Shortly
*
*
*